This guide provides a quick and easy way to get LibreNMS up and running using Docker. Docker simplifies the installation and management of LibreNMS, making it a great option for both beginners and experienced users. While this guide covers the basic setup, you can find more advanced configuration options and troubleshooting tips in the official LibreNMS documentation.
Setting Up LibreNMS with Docker: A Step-by-Step Guide
Prerequisites
Before diving in, ensure you have the following:
- Docker: Make sure Docker Engine and Docker Compose are installed and running on your system. You can find instructions on the official Docker website: https://docs.docker.com/get-docker/
- Git: If you want to clone the LibreNMS repository, you’ll need Git installed.
- Port 8000: Ensure this port is available on your system, as LibreNMS will use it for its web interface.
Steps
- Clone the LibreNMS Repository (Optional):
- Open your terminal and navigate to your desired installation directory.
- Clone the repository:
git clone https://github.com/librenms/docker.git docker-librenms
- Navigate to the Compose Directory:
- If you cloned the repository, change to the
examples/composedirectory within it:cd docker-librenms/examples/compose - If you didn’t clone, you can manually download the
docker-compose.ymlfile from the repository and place it in your desired directory.
- Configure Environment Variables (Optional):
- Copy the
.env.examplefile to.env:cp .env.example .env - Open the
.envfile and modify it to match your setup. You can change the MySQL password, timezone, and other settings.
- Start LibreNMS:
- Run the following command to start the Docker containers:
docker-compose up -d - Docker will download the necessary images and start the containers.
- Access the LibreNMS Web Interface:
- Open your web browser and navigate to
http://localhost:8000. - You should see the LibreNMS login page. Use the default credentials (
librenmsfor both username and password) to log in. - After logging in, you’ll be prompted to change the default password.
Customization (Optional)
- Docker Compose: You can customize the services and their configurations by modifying the
docker-compose.ymlfile. - Additional Plugins: You can add various monitoring plugins to extend LibreNMS’s functionality. Refer to the LibreNMS documentation for details.
Important Notes
- Updating LibreNMS: To update LibreNMS, pull the latest changes from the repository and restart the containers.
- Backing Up Data: Regularly back up your LibreNMS database and configuration files.
- Security: Change the default passwords and implement security best practices to protect your LibreNMS instance.
Digging Deeper into LibreNMS with Docker
Expanded Prerequisites
Before you start, make sure you have the right tools. You’ll need Docker Engine and Docker Compose. These are important for running LibreNMS in a container. You can find them on the Docker website. If you’re using a Linux system like Ubuntu, you can install them with a few simple commands. Git is also helpful for downloading the LibreNMS files. You can get it from the official Git website. Lastly, check that port 8000 is free on your system. LibreNMS uses this port for its web interface. If something else is using it, you’ll need to stop it or change the port.
Detailed Installation Steps
Let’s break down the installation steps. Cloning the LibreNMS repository is optional. You can clone it with Git or download the files directly. Cloning makes it easier to get updates later on. Next, go to the ‘compose’ directory. This is where you’ll find the configuration files. You can customize these files if needed. For example, you might want to change the database password or the time zone. Once you’re ready, run the ‘docker-compose up -d’ command. The ‘-d’ flag means the containers will run in the background. Now you can open your web browser and go to ‘http://localhost:8000’ to see the LibreNMS login page.
Advanced Configuration
Want more control over your LibreNMS setup? You can tweak the Docker Compose file. This lets you change how the containers work. You can also use a different database if you prefer. For example, you could use an external MySQL or PostgreSQL database. Email notifications are handy for alerts. You can set them up in the LibreNMS configuration. For added security, use a reverse proxy like Nginx. This lets you set up HTTPS for a secure connection.
Troubleshooting Tips
Sometimes things don’t go as planned. If you can’t access the LibreNMS web interface, check if the containers are running correctly. You can also look at the logs for any error messages. If you have database problems, make sure the database is running and the connection details are correct. The LibreNMS documentation has more troubleshooting tips if you need them.
Environment Variables
Environment variables are used to customize your LibreNMS setup. Here are some of the important ones:
| Variable | Description |
| DB_HOST | Hostname or IP address of the database server |
| DB_NAME | Name of the LibreNMS database |
| DB_USER | Username for the database |
| DB_PASSWORD | Password for the database |
| BASE_URL | Base URL for the LibreNMS web interface |
| TZ | Time zone for the LibreNMS server |
Prerequisites and Installation Setup
Before diving into the installation of LibreNMS in a Docker container, one needs to prepare the system and install necessary software. Following these steps ensures a smoother setup process.
System Requirements
LibreNMS requires a Linux or Windows operating system and supports multiple architectures, including x86_64 and ARM. A minimal setup for LibreNMS Docker installation would include:
- A Linux distribution like Ubuntu, or a Windows server/desktop.
- Docker should be installed to create containers.
- Docker Compose simplifies the deployment of multi-container Docker applications.
- Ensure system memory and storage are adequate to support the LibreNMS application.
- Prepare MySQL or MariaDB as the database server.
- Install PHP and choose a web server like NGINX for optimal performance.
Installing Docker on Linux or Windows
To run LibreNMS in a Docker container, one must first install Docker:
On Linux:
Visit the Docker official website and select your Linux distribution for specific instructions.
Most Linux distributions like Ubuntu provide easy installation through package managers like
apt.sudo apt update
sudo apt install docker-ce docker-ce-cli containerd.io
On Windows:
- Download Docker Desktop for Windows and follow the setup wizard instructions.
- Ensure Hyper-V and Containers Windows features are enabled for Docker to function correctly.
Docker Compose Installation
After Docker is up and running, the next step is to install Docker Compose:
For Linux:
Pull the Docker Compose binary using
curl.sudo curl -L "https://github.com/docker/compose/releases/download/1.29.2/docker-compose-$(uname -s)-$(uname -m)" -o /usr/local/bin/docker-compose
sudo chmod +x /usr/local/bin/docker-compose
On Windows:
- The Docker Compose tool is included with Docker Desktop.
- Access Docker Compose through command line or Docker Desktop GUI.
In summary, preparing the system by fulfilling the requirements and installing Docker and Docker Compose are essential steps in setting up LibreNMS on your server. It sets the stage for a successful installation and smooth operation of the monitoring system.
Configuring and Running LibreNMS
Before diving into the technicalities, it’s essential to understand that configuring and running LibreNMS involves setting up the database, tweaking environment variables, preparing a web server, and launching the Docker container. This ensures that your network monitoring system runs smoothly.
Database Configuration
To start, configure the database details by setting environment variables such as db_host, db_name, db_user, and db_password. These variables are crucial for LibreNMS to connect and interact with its database. Ensure that the database is accessible to the LibreNMS Docker container.
environment:
  - DB_HOST=db_host
  - DB_NAME=librenms
  - DB_USER=librenms
  - DB_PASSWORD=supersecretpassword
In your Docker Compose file, you will also define the database service, specifying the docker image to use, and mount the necessary volumes for data persistence.
LibreNMS Environment Setup
LibreNMS relies on a variety of environment variables for configuration. Set these variables carefully to fit your specific needs. You can configure settings such as the base URL for the LibreNMS web interface or the time zone. Environment variables are provided in the Docker Compose file or the .env file.
Web Server and SSL Configuration
A reverse proxy such as Nginx can serve the LibreNMS web UI securely. This setup allows the use of SSL certificates for encrypted HTTPS connections. If you’re not using a built-in SSL, configure your reverse proxy to handle SSL termination and forward HTTP traffic to the LibreNMS container.
Launching the Container
After configuration, use the docker-compose up command to launch the LibreNMS container. This command reads your Docker Compose file, sets up the necessary volumes, exposes the right ports, and makes sure all services are communicating as they should.
docker-compose up -d
Once the container is up and running, you can access the LibreNMS WebUI on the defined port, where you’ll complete the setup by logging in and starting to monitor your network.
Post-Installation Tasks and Management
After installing the LibreNMS Docker container, there are several important tasks to perform to ensure the system is secure, efficient, and up-to-date. Let’s go through these post-installation steps to get things running smoothly.
Validating Installation
To validate your LibreNMS Docker installation, access the web UI and check if all services are running correctly. Look for any error messages and refer to the LibreNMS documentation for troubleshooting tips. Confirm that the timezone (TZ) setting is configured correctly to avoid any time-related issues.
Creating an Admin User
Initially, create a secure admin user for system management. Go to the user settings in the LibreNMS interface and add a new user with full administrative rights. It’s vital to use a strong password to enhance security.
Setting Up SNMP and Syslog-NG
For network devices monitoring:
- SNMP: Set up the community string and add devices to LibreNMS using their hostname or IP address.
- Syslog-NG: If you’re using the
sidecar_syslogngcontainer, configuresyslog-ngto receive logs from the network. Ensure thememory_limit,max_input_vars, andupload_max_sizeare properly configured for optimal performance.
Handling Updates and Backups
Regular updates are crucial for stability and security:
- Upgrade: Keep an eye out for new image updates. Use Docker Compose commands to pull and deploy updates.
- Backup: Set a backup routine, especially before upgrades. This ensures that you can restore your LibreNMS to a functioning state in case of any issues.
By managing these areas effectively, you can maintain a robust LibreNMS implementation that’s ready for production use.
Frequently Asked Questions
In this section, we’ll answer some common questions about setting up LibreNMS in a Docker container, ranging from installation using Docker Compose to running it on different systems.
How can I install LibreNMS using Docker Compose?
To install LibreNMS using Docker Compose, clone the LibreNMS Docker repository from GitHub. Navigate to the examples/compose directory within the cloned repo. Edit the Docker Compose and environment files as needed for your setup, then run docker compose up -d in your terminal to start the LibreNMS container.
What are the steps for setting up LibreNMS in a Docker container on Ubuntu?
On Ubuntu, install Docker and Docker Compose first. Then, get the LibreNMS Docker image by pulling it from DockerHub or cloning the repository. Set up the required directories and environmental files. Use the docker-compose up command to bring your LibreNMS Docker container online.
How do I run LibreNMS with Docker on a Macintosh system?
Running LibreNMS with Docker on a Mac requires Docker Desktop to be installed. After setup, open a terminal and execute similar steps as with Ubuntu or any Linux distribution. Make sure to adjust volume paths in the Docker Compose file to match macOS file system structure.
Where can I find the official Docker image for LibreNMS?
The official LibreNMS Docker image is available on Docker Hub. It’s based on Alpine Linux and Nginx. Search for librenms/librenms on Docker Hub, or visit the LibreNMS GitHub page for links and additional information regarding the Docker image.
Is it possible to manage LibreNMS Docker containers using Portainer?
Yes, it’s possible to manage LibreNMS Docker containers using Portainer. Portainer offers a user-friendly interface to manage containers. You can monitor, update, and configure your LibreNMS containers within Portainer by connecting it to your Docker environment.
What is the process for installing LibreNMS in a Docker container on Synology NAS?
To install LibreNMS on a Synology NAS using Docker, use the Synology Docker package to download the LibreNMS image from Docker Hub. Create a container through the Synology interface, and map the necessary volumes and ports. Adjust the environmental settings and use the Synology DSM to manage the container.
How can I make LibreNMS run faster?
To make LibreNMS run faster, you can try a few things. First, make sure your server has enough resources. LibreNMS needs a good amount of CPU, memory, and disk space to run smoothly. You can also optimize the database. Make sure you’re using a fast database server like MariaDB or PostgreSQL. Regularly clean up old data to keep the database size small. Another way to improve speed is to use a caching system. This will store frequently accessed data in memory, so LibreNMS doesn’t have to query the database every time. Finally, keep LibreNMS updated to the latest version. New versions often include performance improvements.
How can I keep my LibreNMS installation secure?
Security is important for any system, and LibreNMS is no exception. Start by using strong passwords for all user accounts, especially the admin account. Change the default passwords as soon as you install LibreNMS. Keep your LibreNMS installation up-to-date. New versions often include security fixes. Use a firewall to limit access to your LibreNMS server. Only allow connections from trusted IP addresses. If you’re accessing LibreNMS over the internet, use HTTPS to encrypt the connection. You can set up HTTPS with a reverse proxy like Nginx. Regularly back up your LibreNMS data and configuration. This will help you recover in case of a security breach.
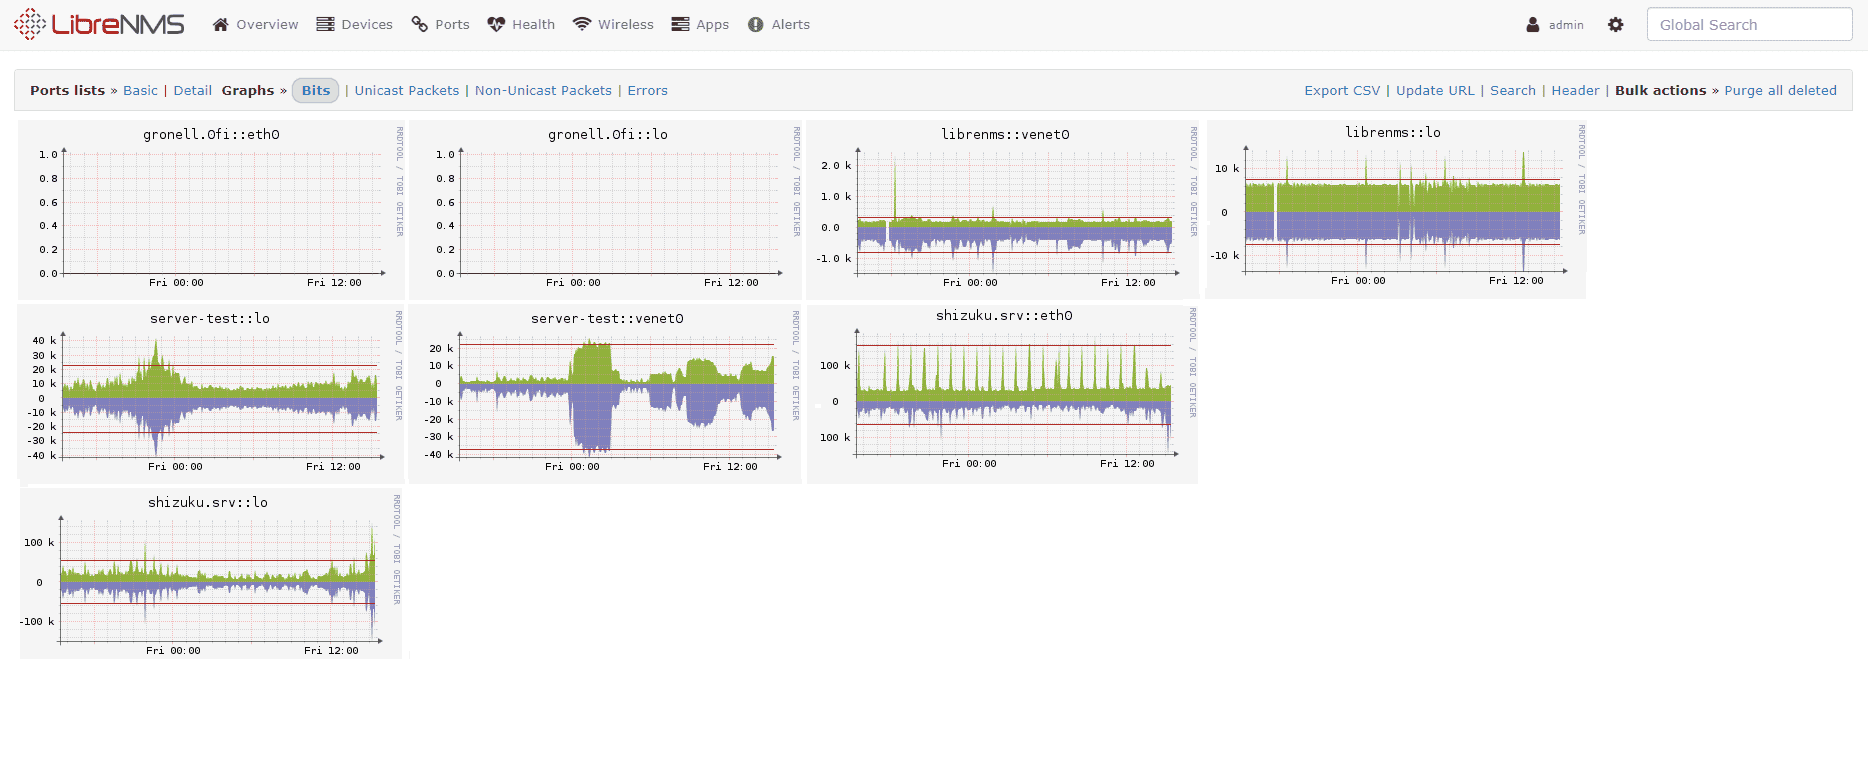
Can I use LibreNMS with other tools?
Yes, you can! LibreNMS can be integrated with other tools to enhance its functionality. For example, you can use Grafana to create dashboards and visualize your monitoring data. Grafana provides a wide range of visualization options and can make it easier to understand your network performance. You can also integrate LibreNMS with alerting systems like Slack or PagerDuty. This allows you to receive notifications about important events in your network. Another option is to use an external configuration management tool like Ansible or Puppet to automate the deployment and configuration of LibreNMS.
What does the error message “SQLSTATE[HY000] [2002] Connection refused” mean?
This error message means that LibreNMS is unable to connect to the database server. There are a few reasons why this might happen. The database server might be down or not running. Check if the database server is running and accessible. There might be a network issue between the LibreNMS server and the database server. Make sure the firewall is not blocking the connection. The database credentials might be incorrect. Double-check the database hostname, username, and password in your LibreNMS configuration. If you’re still having trouble, check the LibreNMS logs for more information about the error.