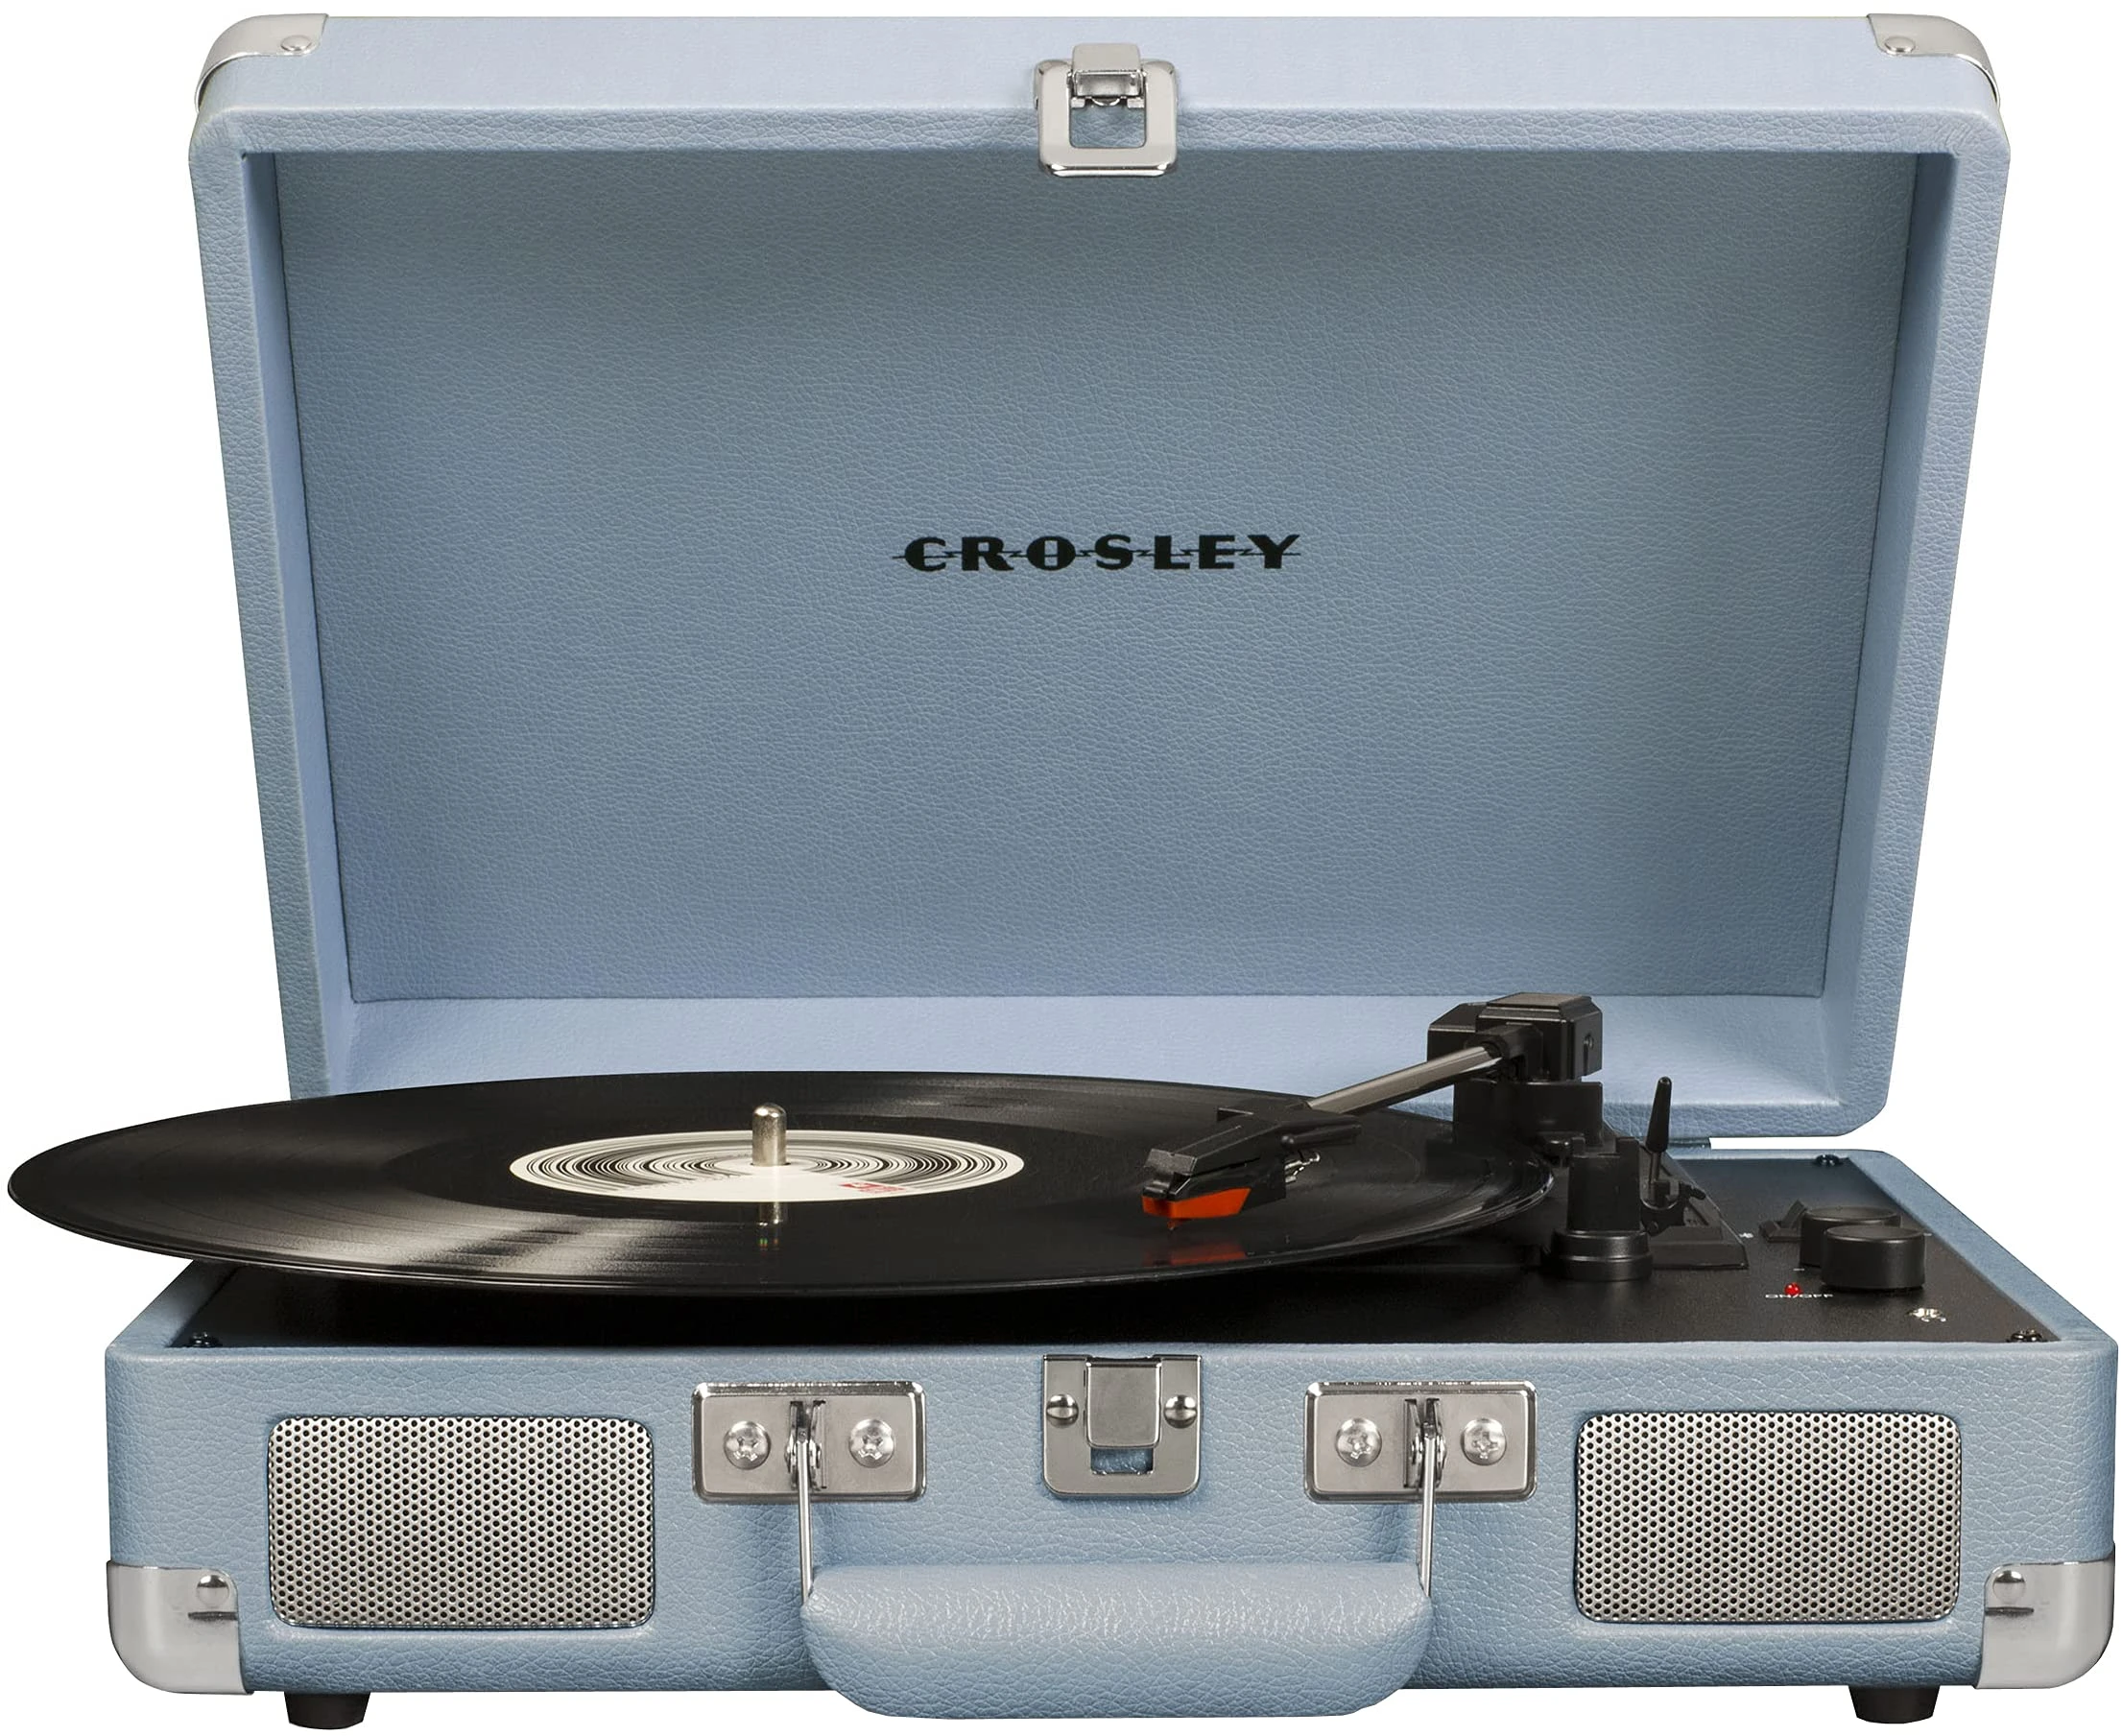
Crosley record players bring the joy of vinyl to music lovers. These affordable turntables offer a simple way to start your vinyl journey. To use a Crosley record player, place it on a flat surface, plug it in, put your vinyl on the platter, and gently lower the tonearm onto the record’s outer edge.
Many Crosley models come with built-in speakers for easy setup. You can also connect external speakers for better sound. Some newer Crosley turntables even have Bluetooth, letting you play vinyl through wireless speakers.
Crosley turntables are user-friendly but have room for growth. As you get more into vinyl, you may want to upgrade to a higher-end player. For now, your Crosley can help you explore the warm, rich sound of records.
| Feature | Crosley Record Player |
|---|---|
| Built-in speakers | Yes (most models) |
| External speaker output | Yes |
| Bluetooth | Some models |
| Typical speed options | 33 1/3, 45, 78 RPM |
| Portability | Many suitcase-style options |
Spinning Vinyl: A Beginner’s Guide to Crosley Record Players
What is a Crosley Record Player?
Crosley Radio is known for its vintage-inspired turntables. These record players offer a nostalgic way to enjoy vinyl records. They often feature retro designs, built-in speakers, and sometimes additional features like Bluetooth connectivity or CD players. Crosley players are generally considered entry-level turntables, making them a popular choice for beginners and casual listeners.
Understanding the Basic Components
Before you start playing records, it’s helpful to understand the key parts of a Crosley record player:
- Platter: The rotating disc where you place the record.
- Tonearm: The arm that holds the cartridge and stylus (needle).
- Cartridge: Contains the stylus and converts the vibrations from the record grooves into an electrical signal.
- Stylus (Needle): The small diamond or sapphire tip that tracks the grooves of the record.
- Speakers: Many Crosley players have built-in speakers. Some models also have outputs for external speakers.
- Speed Selector: Allows you to select the correct playback speed (33 ⅓ RPM for LPs, 45 RPM for singles).
Setting Up Your Crosley Record Player
Setting up a Crosley player is usually straightforward:
- Place the Platter: Place the platter on the center spindle.
- Connect the Power: Plug in the power cord.
- Remove the Stylus Cover: Carefully remove the protective cover from the stylus.
- Select the Correct Speed: Set the speed selector to 33 ⅓ RPM for LPs or 45 RPM for singles. You may need an adapter for 45s, depending on the model.
Playing a Record
Now you’re ready to play a record:
- Place the Record: Carefully place the record on the platter.
- Start the Platter: Turn on the player or move the tonearm over the record to start the platter spinning.
- Lower the Tonearm: Gently lower the tonearm onto the record. Most Crosley players have a cueing lever to help with this.
- Adjust the Volume: Adjust the volume to your desired level.
Maintaining Your Crosley Record Player
Proper maintenance will help keep your Crosley player in good working condition:
- Clean the Stylus: Regularly clean the stylus with a stylus brush to remove dust and debris.
- Clean Your Records: Keep your records clean using a record brush or cleaning solution.
- Replace the Stylus: The stylus will eventually wear out and need to be replaced. Check your user manual for replacement instructions.
Crosley Models and Features
Crosley offers a range of models with different features:
| Feature | Description |
|---|---|
| Built-in Speakers | Convenient for casual listening. |
| Bluetooth Connectivity | Allows you to stream music wirelessly from your phone or other devices. |
| USB Recording | Lets you digitize your vinyl collection. |
| Auxiliary Input | Connect external devices like MP3 players. |
Upgrading Your Crosley Player
While Crosley players are great for beginners, some users may eventually want to upgrade certain components for better sound quality. Common upgrades include replacing the stylus or adding external speakers.
Choosing Your First Record
Choosing your first record is part of the fun! Consider your favorite artists or genres. Used record stores and online marketplaces are great places to find affordable vinyl.
Initial Setup and Assembly
The resurgence of vinyl records has brought a renewed interest in record players, and Crosley has become a popular name for those starting their vinyl journey. Known for their retro aesthetics and user-friendly designs, Crosley record players offer an accessible way to experience the warm, rich sound of vinyl. This guide provides a simple introduction to using a Crosley record player, covering everything from setup to maintenance, so you can start enjoying your records right away.
Setting up your Crosley record player involves unpacking, connecting power, and assembling key components. These steps ensure your turntable is ready for optimal performance and enjoyment.
Unpacking and Power Connection
Start by carefully removing your Crosley record player from its packaging. Check the box contents against the list in the manual to ensure all parts are present. Look for the platter, drive belt, tonearm, and 45 RPM adapter.
Place the turntable on a flat, stable surface away from heat sources. Locate the power cord at the back of the unit. Plug it into a nearby outlet. Some models use a power adapter. If so, connect the adapter to the player first, then to the wall socket.
Before powering on, remove any protective covers. This often includes a stylus protector on the cartridge. Keep these for future storage.
Assembling Components
Begin assembly by placing the platter onto the spindle. Ensure it sits level and spins freely. If your model has a separate drive belt, loop it around the platter and motor pulley.
Next, focus on the tonearm. Some Crosley models require you to balance the tonearm. Consult your manual for specific instructions on this process. It’s crucial for proper tracking and sound quality.
Install the cartridge if it’s not pre-mounted. Attach the headshell to the tonearm, making sure connections are secure. Place the slip mat on the platter to protect your records.
| Component | Installation Step |
|---|---|
| Platter | Place on spindle |
| Drive Belt | Loop around platter and motor |
| Tonearm | Balance if required |
| Cartridge | Mount if separate |
| Slip Mat | Place on platter |
Finally, connect the RCA cables to your amplifier or powered speakers. Your Crosley record player is now set up and ready to play your favorite vinyl.
Operational Instructions
Using a Crosley record player involves a few key steps. You’ll need to power on the device, select the correct speed, and properly handle your vinyl records. Let’s explore the essential operational instructions for your Crosley turntable.
Switching On and Selecting the Speed
To start using your Crosley record player, locate the power dial. This control typically doubles as the volume knob. Turn it clockwise to switch on the device and adjust the volume to your liking.
Next, find the speed switch. Crosley turntables usually support three speeds:
- 33 1/3 RPM for most full-size albums
- 45 RPM for singles and EPs
- 78 RPM for older records
Select the appropriate speed based on your vinyl record. If you’re unsure, check the label on your record for guidance.
Placing and Playing Vinyl Records
Handle your vinyl records with care. Hold them by the edges and center label to avoid fingerprints or scratches on the playing surface.
To play a record:
- Remove the record from its sleeve
- Place it gently on the turntable platter
- Use the cueing lever to raise the tonearm
- Position the tonearm over the outer edge of the record
- Lower the cueing lever to place the needle on the record
The turntable will start spinning automatically on many Crosley models. If not, you may need to press a start button.
Using the Turntable Features
Your Crosley record player may have additional features to enhance your listening experience. Many models include built-in speakers for convenient playback. If you prefer external audio equipment, look for RCA outputs on the back of the unit.
Some Crosley turntables offer Bluetooth connectivity. To use this feature:
- Set the function switch to Bluetooth mode
- Enable Bluetooth on your device
- Search for and connect to your Crosley model
For precise speed adjustment, your turntable might include a pitch control. Use this to fine-tune playback speed if needed.
| Feature | Function |
|---|---|
| Built-in Speakers | Convenient audio playback |
| RCA Outputs | Connect to external audio systems |
| Bluetooth | Wireless streaming to compatible devices |
| Pitch Control | Adjust playback speed |
Remember to return the tonearm to its rest when you’re done playing a record. This helps protect both the needle and your vinyl.
Connecting External Devices
Crosley record players offer multiple options for connecting external devices. You can easily enhance your listening experience by utilizing RCA outputs, Bluetooth functionality, or headphone jacks.
Utilizing the RCA Output
RCA output ports on your Crosley record player allow you to connect to external speakers or a stereo system. Locate the red and white RCA ports on the back of your player. Connect RCA cables to these ports, matching the colors.
Plug the other end into your external device’s audio input. This setup provides a wired connection for high-quality sound transmission. Ensure all connections are secure before powering on your devices.
Adjust the volume on both your Crosley player and the connected device for optimal sound levels. RCA connections offer a reliable and interference-free audio experience.
Setting Up Bluetooth Output
Many Crosley models feature Bluetooth output capabilities. This allows wireless connection to Bluetooth-enabled speakers or headphones. To use this feature, set your Crosley’s function switch to the “Bluetooth” position.
Enable Bluetooth on your external device and put it in pairing mode. Your Crosley should appear in the list of available devices. Select it to establish the connection.
Once paired, audio from your record player will transmit wirelessly. Keep your Bluetooth device within range for the best signal quality. This feature adds flexibility to your listening setup.
Headphones and Auxiliary Devices
For private listening, Crosley record players typically include a headphone jack. Simply plug your headphones into the designated port. This automatically mutes the built-in speakers.
Some models also feature an auxiliary input. This allows you to play audio from external devices through your Crosley’s speakers. Use a 3.5mm audio cable to connect your device to the aux-in port.
| Connection Type | Best For | Key Benefit |
|---|---|---|
| RCA | External speakers/stereos | High-quality wired audio |
| Bluetooth | Wireless speakers/headphones | Convenience and flexibility |
| Headphone Jack | Private listening | Personal audio experience |
| Aux-In | Playing external devices | Versatility in audio sources |
Choose the connection method that best suits your needs and setup. Each option expands the functionality of your Crosley record player.
Maintenance and Troubleshooting
Proper care and quick problem-solving are key to keeping your Crosley record player in top condition. Regular cleaning and basic maintenance will extend its life and ensure optimal performance.
Routine Cleaning and Maintenance
Clean your turntable regularly to prevent dust buildup. Use a soft, lint-free cloth to wipe the dust cover and base. For the platter, remove it and clean both sides with a slightly damp cloth. Dry thoroughly before replacing.
Replace the needle every 1000 hours of play or if you notice a decline in sound quality. Gently remove the old needle and insert the new one, ensuring it’s securely in place.
Check the belt periodically for signs of wear or stretching. If it’s loose or damaged, replace it to maintain proper turntable speed.
| Component | Cleaning Frequency | Replacement Interval |
|---|---|---|
| Dust Cover | Weekly | As needed |
| Platter | Monthly | Rarely |
| Needle | After each use | Every 1000 hours |
| Belt | Check monthly | Every 1-2 years |
Troubleshooting Common Issues
If your record player won’t turn on, first check the power cable connection. Ensure the polarized plug is correctly inserted into a working outlet. If the issue persists, inspect the power cord for damage.
For speed issues, adjust the speed selector switch. If problems continue, the belt may need replacement or adjustment. Remove the platter to access and inspect the belt.
No sound? Check your function switch settings. Ensure it’s set to “Phono” for vinyl playback. Verify speaker connections and volume levels.
If the tonearm doesn’t lower or lift properly, it may need resetting. Gently move it to the resting position and try again. Avoid forcing the tonearm, as this can damage the mechanism.
For crackling sounds, clean the needle and record surface. If the problem continues, the needle may need replacement. Always handle the stylus with care to avoid bending or breaking it.
Frequently Asked Questions
Crosley record players are user-friendly devices. Here are answers to common questions about operating and troubleshooting these turntables.
How can I turn on my Crosley record player?
To turn on your Crosley record player, rotate the volume on/off knob. This control typically serves as both the power switch and volume adjuster. Turning it clockwise will power up the device and increase the volume.
What steps are involved in connecting my Crosley record player to a Bluetooth device?
To connect your Crosley to a Bluetooth device:
- Place your Bluetooth device close to the record player.
- Set the function switch to the “Bluetooth” position.
- Enable Bluetooth on your receiving device and search for the Crosley.
- Select the Crosley from the list of available devices to pair.
What should I do if my Crosley record player isn’t spinning?
If your Crosley isn’t spinning:
- Check the power connection.
- Ensure the belt is properly seated on the motor pulley and platter.
- Verify the correct speed setting is selected.
- Clean the belt and pulleys to remove any debris.
How do I troubleshoot a Crosley record player that won’t turn on?
To troubleshoot a Crosley that won’t turn on:
- Check the power cord connection.
- Try a different outlet.
- Inspect the fuse if your model has one.
- Look for any visible damage to the power switch.
How can I replace or install a new needle on my Crosley record player?
To replace the needle on your Crosley:
- Gently remove the old needle by pulling it straight down.
- Align the new needle with the cartridge.
- Push the new needle up until it clicks into place.
- Double-check that it’s securely attached.
What are the instructions for using the Crosley Voyager record player?
To use the Crosley Voyager:
- Open the lid and place your record on the platter.
- Select the correct speed using the switch.
- Lift the tonearm using the cueing lever.
- Position the needle over the record’s outer edge.
- Lower the tonearm to begin playback.
| Feature | Crosley Voyager |
|---|---|
| Speeds | 33 1/3, 45, 78 RPM |
| Built-in Speakers | Yes |
| Bluetooth | Yes |
| Portable | Yes |
| USB Output | Model dependent |


