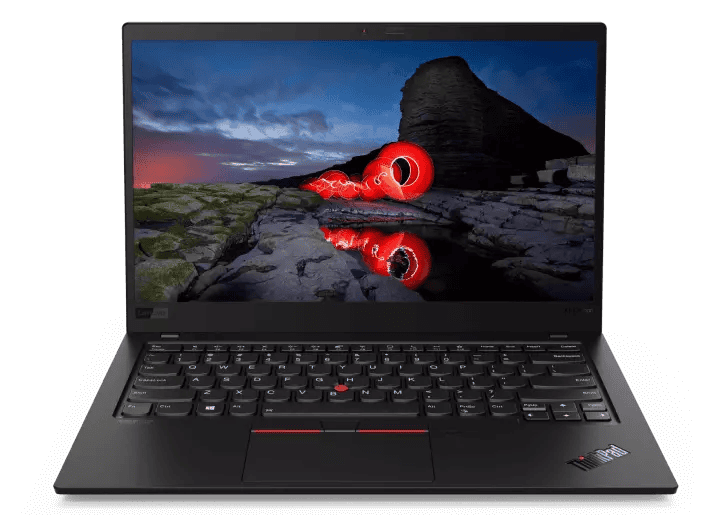
Turning on your ThinkPad X1 is a simple process. To power up your ThinkPad X1, press the power button located above the keyboard. This sleek button, often marked with a power symbol, brings your device to life.
Before pressing the power button, make sure your ThinkPad X1 is charged or connected to a power source. If the battery is completely drained, you may need to wait a few minutes after plugging it in before attempting to turn it on.
Lenovo has designed the ThinkPad X1 with user-friendly features. The power button is easy to find and use. Once pressed, you’ll see the display light up and the Lenovo logo appear, indicating a successful start-up.
| Feature | Description |
|---|---|
| Power Button | Located above keyboard |
| Start-up Time | Quick boot process |
| Display | Lights up on power-on |
| Power Indicator | LED shows power status |
Turning On Your ThinkPad X1: A Quick Start Guide
Locating the Power Button
The power button on a ThinkPad X1 is usually located on the right side of the keyboard deck, near the top right corner. It’s a small, circular button, and sometimes has a power icon (a circle with a line through it). On some newer models, it might be integrated into the keyboard itself, often near the delete key, or it might be a separate button on the side of the laptop.
Turning On Your ThinkPad X1
Once you’ve located the power button, turning on your ThinkPad X1 is simple:
- Press the power button firmly and briefly. You don’t need to hold it down.
- The ThinkPad logo will appear on the screen, indicating that the laptop is starting up.
- Wait for the operating system (usually Windows) to load. This may take a few moments.
- Once the login screen appears, you can enter your password (if you have one set) and start using your ThinkPad.
What to Do If Your ThinkPad X1 Doesn’t Turn On
If your ThinkPad X1 doesn’t turn on after pressing the power button, try these troubleshooting steps:
- Check the power adapter: Make sure the power adapter is properly plugged into both the laptop and a working wall outlet. Check the adapter for any signs of damage.
- Check the battery: If your ThinkPad X1 has a removable battery, try removing it and reinserting it. If it’s a built-in battery, try holding the power button down for about 10-15 seconds. This can sometimes perform a hard reset.
- Check the charging indicator: When the power adapter is plugged in, there should be an indicator light on the laptop (often near the charging port) showing that it’s charging. If this light isn’t on, there might be a problem with the adapter or the charging port.
- Try a different power outlet: Sometimes the problem is with the wall outlet, not the laptop. Try plugging the adapter into a different outlet.
- External Devices: Disconnect all external devices such as USB drives, external hard drives, and monitors. Sometimes a faulty peripheral can prevent the laptop from booting.
If None of These Steps Work
If you’ve tried all these steps and your ThinkPad X1 still won’t turn on, it’s likely a hardware issue. In this case, it’s best to contact Lenovo support or a qualified computer repair technician for further assistance.
Other Important First Steps
After turning on your ThinkPad X1 for the first time, there are a few things you should do:
- Connect to Wi-Fi: Connect to your Wi-Fi network so you can access the internet.
- Update Windows: Check for and install any available Windows updates. This will ensure your system is secure and has the latest features.
- Install Lenovo Vantage: Lenovo Vantage is a helpful utility that provides system updates, diagnostics, and other useful tools for your ThinkPad.
- Set up your user account: Create a user account with a strong password to protect your data.
Preparing Your ThinkPad X1 for First Use
Getting your new ThinkPad X1 ready involves a few key steps. These include unpacking the device and setting it up for its initial charge.
Unboxing and Initial Setup
Start by opening the ThinkPad X1 box carefully. Inside you’ll find:
- ThinkPad X1 laptop
- AC power adapter
- Power cord
- User manual
- Safety and compliance notices
Remove the protective wrapping from the laptop. Place it on a flat, stable surface. Open the lid to reveal the screen and keyboard.
Look for the power button. It’s usually on the side or above the keyboard. Don’t press it yet.
Check the user manual for any specific setup instructions for your model. This guide often contains helpful tips for first-time use.
Charging the ThinkPad X1
Before turning on your ThinkPad X1, charge it fully. Here’s how:
- Connect the AC power adapter to your laptop.
- Plug the power cord into the adapter.
- Insert the other end into a wall outlet.
A small light near the charging port will turn on. This indicates the laptop is charging.
| Charge Level | Indicator Light |
|---|---|
| 0-20% | Red |
| 21-80% | Amber |
| 81-100% | Green |
Full charging is recommended before first use. This usually takes 2-3 hours.
Many ThinkPad X1 models have a Rapid Charge function. This can charge the battery to 80% in about an hour.
Once fully charged, press the power button to start your ThinkPad X1. Follow the on-screen prompts to set up your new laptop.
Activating the ThinkPad X1
Turning on your ThinkPad X1 for the first time involves powering up the device and configuring the operating system. This process sets up your laptop for use and personalizes it to your preferences.
Powering On the Device
To start your ThinkPad X1, locate the power button. It’s usually on the right side or top-right corner of the keyboard. Press and hold it for about 2-3 seconds. The laptop’s screen will light up, showing the Lenovo logo.
If the laptop doesn’t turn on, connect the power adapter and try again. Ensure the battery has some charge.
Once powered on, you might see the UEFI BIOS menu. This is normal for new devices. You can adjust settings here or press F10 to save and exit.
Setting Up Operating Systems
After powering on, you’ll begin the operating system setup. Windows is the most common OS for ThinkPads. Follow the on-screen prompts to:
- Select your region and language
- Connect to Wi-Fi
- Create or sign in to a Microsoft account
- Choose privacy settings
During setup, you can customize various options. Consider enabling Windows Hello for secure login using facial recognition or fingerprint.
Once Windows is set up, install the Lenovo Vantage app. It helps manage your ThinkPad’s hardware settings and keeps drivers updated.
| Setup Step | Purpose |
|---|---|
| Power On | Start the device |
| OS Setup | Configure Windows |
| Vantage App | Manage ThinkPad features |
Exploring the ThinkPad X1 Features
The ThinkPad X1 boasts advanced hardware and robust security features. It combines cutting-edge technology with user-friendly design to enhance productivity and protect sensitive data.
Hardware Components and Connectivity
The ThinkPad X1 offers impressive display options. You can choose an OLED display with 2880 × 1800 pixels, providing crisp visuals and vibrant colors. This screen is Eye Comfort Certified, reducing eye strain during long work sessions.
For memory and storage, the X1 doesn’t disappoint. It supports up to 32 GB of LPDDR5X RAM, ensuring smooth multitasking. Storage options include M.2 solid-state drives with capacities up to 2 TB, offering ample space for your files and applications.
Audio quality is a standout feature. The X1 incorporates Dolby Atmos technology, delivering immersive sound for music, videos, and calls. Dolby Voice enhances audio clarity during video conferences, reducing background noise and improving voice quality.
Connectivity options include:
- Wi-Fi 6E
- Bluetooth 5.2
- Thunderbolt 4 ports
- HDMI output
These features ensure you stay connected and productive in various work environments.
Security and Privacy Functions
The ThinkPad X1 prioritizes your data protection with multiple security measures. A fingerprint reader allows quick and secure login, while face authentication adds an extra layer of protection.
The X1 includes a Trusted Platform Module (TPM) 2.0 chip, safeguarding your encryption keys and passwords. This hardware-based security feature helps prevent unauthorized access to sensitive information.
Privacy features enhance your peace of mind:
| Feature | Function |
|---|---|
| Lenovo View Privacy Guard | Limits screen visibility to onlookers |
| Lenovo View Privacy Alert | Notifies you of potential “shoulder surfers” |
| Webcam Privacy Shutter | Physically blocks the camera when not in use |
These tools give you control over your digital privacy, especially in public spaces or shared work areas.
The X1’s security suite also includes software solutions. Lenovo’s ThinkShield platform offers comprehensive protection against cyber threats, from malware detection to secure disposal of sensitive data.
Connectivity and Support Features
The ThinkPad X1 offers a range of connectivity options and support features to enhance your user experience. These include advanced networking capabilities and helpful assistance tools.
Networking and Communication
The ThinkPad X1 supports various wireless technologies. It comes with Wireless LAN for Wi-Fi connectivity. You can connect to 4G or 5G cellular networks with the optional Wireless WAN card. Bluetooth is also available for pairing with accessories.
For wired connections, you can use the USB-C or Thunderbolt 4 ports. These allow you to connect external displays and other peripherals. If you need a wired internet connection, you can use a Lenovo USB-C to Ethernet adapter.
GPS functionality is included in models with Wireless WAN. This helps with location-based services and navigation.
| Connection Type | Available on ThinkPad X1 |
|---|---|
| Wi-Fi | Yes |
| Bluetooth | Yes |
| 4G/5G | Optional |
| Ethernet | With adapter |
| GPS | On WWAN models |
Assistance and Maintenance
Lenovo provides several apps and features to help maintain your ThinkPad X1. The Lenovo Quick Clean app lets you temporarily disable input devices for easy cleaning.
Intelligent Cooling adjusts performance and fan speeds to keep your device running smoothly. If your computer stops responding, you can use the reset hole to turn it off.
For repairs, Lenovo offers a limited warranty. Check your warranty terms for coverage details. You can also find additional support resources on the Lenovo website.
Frequently Asked Questions
Turning on your ThinkPad X1 can sometimes be tricky. Here are answers to common questions about powering on various ThinkPad X1 models and troubleshooting power issues.
How do I power on my ThinkPad X1 Carbon for the first time?
To power on your ThinkPad X1 Carbon for the first time:
- Connect the power adapter to your computer.
- Plug the power cord into an outlet.
- Press the power button.
It’s best to fully charge the laptop before first use.
What should I do if my ThinkPad X1 Yoga doesn’t turn on?
If your ThinkPad X1 Yoga won’t turn on:
- Check the power connection.
- Try a different outlet.
- Remove external devices.
- Press and hold the power button for 10 seconds.
If these steps don’t work, contact Lenovo support.
Where is the power button located on the Lenovo ThinkPad X1 Series?
The power button on most ThinkPad X1 models is in the top-right corner of the keyboard. Look for a small, round button with a power symbol.
What troubleshooting steps should I take if my ThinkPad X1 Carbon Gen 8 won’t turn on?
To troubleshoot a ThinkPad X1 Carbon Gen 8 that won’t turn on:
- Ensure the battery is charged.
- Try a different power adapter.
- Disconnect all peripherals.
- Perform a hard reset by holding the power button for 30 seconds.
If the problem persists, seek professional help.
How can I resolve issues with the power button on my Lenovo X1 Carbon?
To resolve power button issues on your X1 Carbon:
- Clean around the button gently.
- Update or reinstall keyboard drivers.
- Check for loose internal connections.
If these steps don’t work, the power button may need replacement.
What are the common reasons a ThinkPad X1 might not power on?
Common reasons a ThinkPad X1 might not power on include:
- Dead battery
- Faulty power adapter
- Loose power connection
- BIOS issues
- Hardware failure
| Issue | Quick Fix |
|---|---|
| Dead battery | Charge for 30 minutes |
| Faulty adapter | Try a different adapter |
| Loose connection | Check all power connections |
| BIOS issue | Reset BIOS to defaults |
| Hardware failure | Seek professional repair |
Try these quick fixes before seeking professional help.


