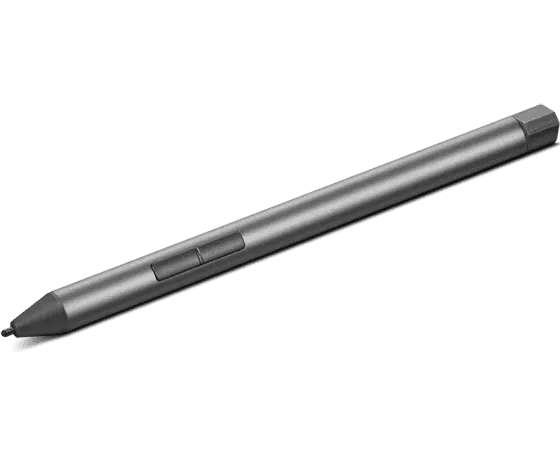
Charging your Lenovo pen is a simple process that keeps your digital writing tool ready for use. Most Lenovo pens charge quickly when inserted into their designated slot on compatible devices. The pen slot not only secures your stylus but also powers it up.
For Lenovo pens without a charging slot, other methods exist. Some models use replaceable batteries, while others charge via USB-C cables. Knowing your pen’s specific charging needs ensures you’re never caught with a dead stylus during important tasks.
Different Lenovo pen models have varying charge times and battery life. Let’s compare some common Lenovo pen charging methods:
| Charging Method | Charge Time | Battery Life |
|---|---|---|
| Pen Slot | 5-15 minutes | Up to 2 weeks |
| USB-C Cable | 30-60 minutes | Up to 1 month |
| AAAA Battery | N/A (replaceable) | Several months |
Charging Your Lenovo Pen
Identifying Your Lenovo Pen Type
Lenovo offers several different types of pens. Each has a different charging method. It’s important to know which pen you have to charge it correctly. Here are some common types:
- Lenovo Active Pen: These pens often use AAAA batteries or are rechargeable via USB.
- Lenovo Active Pen 2: These are usually rechargeable via USB.
- Lenovo Precision Pen: These pens are often rechargeable via USB-C.
- Lenovo Digital Pen: These pens often use AAAA batteries.
Charging a Lenovo Pen with a USB Port
Many Lenovo pens are rechargeable with a USB port. This is usually a micro-USB or USB-C port on the pen itself.
- Locate the charging port on your pen. It’s often covered by a small cap.
- Connect the pen to a USB port on your computer or a USB wall adapter using the appropriate cable (micro-USB or USB-C).
- The pen will usually have an LED indicator light that shows the charging status. This light may turn on, blink, or change color while charging.
- Let the pen charge fully. The charging time can vary depending on the model. Check your pen’s documentation for specific charging times.
- Once fully charged, disconnect the pen from the USB port.
Replacing AAAA Batteries
Some Lenovo pens use AAAA batteries. These batteries are smaller than standard AAA batteries. They are readily available online and in many stores.
- Locate the battery compartment on your pen. This is often near the top or bottom of the pen. It may have a small slot or screw.
- Open the battery compartment. You may need a small tool, like a flathead screwdriver or a SIM card ejector tool.
- Remove the old AAAA battery.
- Insert a new AAAA battery, making sure the positive (+) and negative (-) ends are oriented correctly. The battery compartment will usually have markings to show you the correct orientation.
- Close the battery compartment securely.
Checking the Pen’s Battery Level (If Applicable)
Some Lenovo pens have software or indicators that show the battery level. This is often found in the Windows settings or Lenovo Vantage software.
- Open Windows Settings.
- Go to “Bluetooth & devices” and then “Pen & Windows Ink.”
- If your pen is connected, you should see its battery level displayed.
Or, if you have Lenovo Vantage installed:
- Open Lenovo Vantage.
- Look for a section related to pen settings or accessories.
- You may find battery information there.
Understanding the Lenovo Pen
Lenovo pens offer digital writing and drawing capabilities for compatible devices. These tools enhance productivity and creativity with pressure sensitivity and customizable functions.
Types of Lenovo Pens
Lenovo produces several pen models to suit different devices and user needs. The garaged rechargeable electronic pen slots into compatible laptops for easy storage and charging. This pen charges quickly, reaching 80% in 15 seconds and full charge in 5 minutes.
The Lenovo Integrated Pen offers similar features but may have different charging methods. Some models use USB cables for power.
Rechargeable stylus pens provide an alternative for devices without built-in storage. These typically charge via USB and offer longer battery life.
Components and Functions
Lenovo pens contain several key components:
- Pressure sensors: Detect writing force for varied line thickness
- Barrel buttons: Programmable for functions like erasing or right-clicking
- Charging mechanism: Varies by model (garage slot or USB)
- Tip: Replaceable for continued precision
Functions often include:
| Feature | Benefit |
|---|---|
| Pressure sensitivity | Natural writing feel |
| Tilt recognition | Shading and line variation |
| Palm rejection | Prevents accidental input |
These features allow you to write, draw, and navigate your device with precision and ease.
Compatibility and Drivers
Lenovo pens work with specific device models. Check your device’s specifications to ensure compatibility. Most recent Lenovo tablets and 2-in-1 laptops support pen input.
For full functionality, you may need to install the correct drivers. The Wintab driver is often required for pressure sensitivity in certain apps.
To set up your pen:
- Turn on Bluetooth (if applicable)
- Install necessary drivers
- Customize button functions in device settings
For the best experience, keep your pen’s firmware and device drivers up to date. This ensures optimal performance and access to the latest features.
Charging Your Lenovo Pen
Keeping your Lenovo Pen charged is essential for uninterrupted use. The process is simple and can be done in different ways depending on your device model.
Identifying the Battery Power Status
To check your Lenovo Pen’s battery level, look for the LED indicator. It blinks red when the battery is low. Some models display the pen’s battery status on your device screen.
For integrated pens, press the top button briefly. The LED will flash to show the battery power status. One flash means low battery, while three flashes indicate a full charge.
Always monitor your pen’s battery to avoid unexpected power loss during use.
Using the Pen Slot or USB-C Cable
Lenovo offers two main charging methods for their pens:
- Pen Slot: Many Lenovo devices have a built-in slot to charge the pen.
- USB-C Cable: Some pens can be charged using a USB-C cable.
For pen slot charging, insert the pen into the designated slot on your device. Ensure it’s properly seated for efficient charging.
To charge via USB-C:
- Locate the USB-C port on your pen
- Connect the USB-C cable to the pen
- Plug the other end into a powered USB port
The charging process is straightforward and uses a magnetic connection for secure attachment.
LED Indicator and Charging Indicators
The LED indicator provides valuable information about your pen’s charging status:
| LED Color | Meaning |
|---|---|
| Solid Amber | Charging in progress |
| Solid White | Fully charged |
| Blinking Red | Low battery |
A full charge typically takes about two hours. The pen is 80% charged after approximately 15-20 minutes of charging.
When the LED turns solid white, your pen has reached 100% charge. You can then disconnect it from the charger or remove it from the pen slot.
Remember to check the LED regularly to maintain optimal battery levels for your Lenovo Pen.
Best Practices for Use and Maintenance
Proper care and maintenance of your Lenovo pen ensures optimal performance and longevity. Follow these guidelines to protect your device and keep it functioning at its best.
Proper Storage of the Pen
Store your Lenovo pen in a cool, dry place away from direct sunlight. When not in use, insert the pen back into its slot on your device. This protects it from damage and keeps it charged. For pens without a built-in slot, use a protective case.
Avoid leaving the pen in extreme temperatures. High heat can damage internal components. Cold temperatures may affect battery performance.
Keep the pen away from strong magnetic fields. These can interfere with its electronic components.
Clean the pen regularly with a soft, dry cloth. Remove any dirt or debris from the tip to maintain accuracy.
Protecting Your Pen from Damage
Handle your Lenovo pen with care to prevent drops or impacts. The internal components are sensitive to shock.
Don’t apply excessive pressure when using the pen. This can damage both the pen tip and your device’s screen.
Keep the pen away from liquids. Most Lenovo pens are not waterproof. Avoid using in humid environments or near water sources.
When traveling, store the pen securely to prevent jostling or pressure from other items.
Use only compatible tips and replacements. Incorrect parts may damage the pen or your device.
| Do’s | Don’ts |
|---|---|
| Store in a cool, dry place | Expose to extreme temperatures |
| Clean regularly | Use excessive pressure |
| Handle with care | Allow contact with liquids |
| Use compatible parts | Leave near magnetic fields |
Maintenance Tips
Check your pen’s battery level regularly. Charge it before it’s completely drained to extend battery life.
Update the pen’s firmware when available. This ensures optimal performance and compatibility.
Inspect the pen tip periodically for wear. Replace it when it becomes dull or damaged.
If your pen has replaceable batteries, use high-quality ones. Follow the manufacturer’s recommendations.
Calibrate your pen occasionally to maintain accuracy. Use the built-in calibration tools on your device.
Clean the charging contacts on both the pen and device. This ensures efficient charging.
Utilizing Your Lenovo Pen
The Lenovo Pen offers versatile functionality for writing, drawing, and interacting with your device. It enhances productivity and creativity across various applications.
Writing and Drawing Applications
Your Lenovo Pen works seamlessly with popular writing and sketching apps. Microsoft OneNote integrates well, allowing you to jot down ideas and create quick sketches. Adobe Creative Suite supports pressure sensitivity for digital art.
For note-taking, try Evernote or Noteshelf. These apps recognize handwriting and convert it to text. Autodesk SketchBook and Procreate are ideal for digital artists, offering advanced brush options.
The ThinkPad Pen Pro provides excellent precision for technical drawings. It’s compatible with CAD software like AutoCAD and SolidWorks.
Customizing Pen Settings
Adjust your Lenovo Pen settings to fit your needs. Access these options through Windows Settings > Devices > Pen & Windows Ink.
Here you can:
- Modify pressure sensitivity
- Change button functions
- Enable palm rejection
The Lenovo Precision Pen 2 offers additional customization through the Lenovo Pen Settings app. This app lets you fine-tune tilt sensitivity and adjust hover distance.
Remember to update your pen’s firmware regularly for optimal performance and new features.
Pen Interaction with Touchscreens
Your Lenovo Pen enhances touchscreen interaction. Use it for precise selections in cramped interfaces or when wearing gloves. The pen tip provides better accuracy than fingers for small targets.
In web browsers, the pen allows easy scrolling and link selection. Text editing becomes more efficient as you can place the cursor exactly where needed.
Many Lenovo devices support palm rejection technology. This feature lets you rest your hand on the screen while writing or drawing without causing unwanted input.
| Feature | Benefit |
|---|---|
| Pressure Sensitivity | Creates varied line thickness |
| Tilt Support | Enables shading effects |
| Palm Rejection | Prevents accidental touches |
| Customizable Buttons | Quick access to functions |
Frequently Asked Questions
Charging your Lenovo pen can be simple once you know the right steps. Here are answers to common questions about keeping your digital pen powered up.
What are the steps to charge the Lenovo Active Pen 2?
To charge the Lenovo Active Pen 2, locate the USB charging dock that came with your pen. Plug the dock into a USB port on your computer or a wall adapter. Place the pen in the dock, ensuring the charging contacts align. The LED light on the pen will glow red while charging and turn off when fully charged.
Can the Lenovo Precision Pen 2 be charged without a charger, and if so, how?
The Lenovo Precision Pen 2 uses a rechargeable battery that requires its specific charger. It cannot be charged without the proper charging equipment. Always use the provided USB-C charging cable or dock to power up your pen.
How do I know when my Lenovo Pen needs recharging?
Most Lenovo pens have an LED indicator. When the battery is low, this light will flash red. Some models may also show a low battery warning on your device’s screen. It’s best to recharge your pen when you notice these signs to avoid interruptions in use.
Which type of battery is compatible with Lenovo pens, and where can it be purchased?
Lenovo pens typically use built-in rechargeable batteries. These are not meant to be replaced by users. If your pen’s battery life diminishes over time, contact Lenovo support for guidance on repair or replacement options.
What should I do if my Lenovo Yoga 9i pen isn’t charging?
First, ensure the charging contacts are clean. Check that the USB cable or charging dock is properly connected to a power source. Try a different USB port or power outlet. If the problem persists, the pen or charger may be faulty. Contact Lenovo support for further assistance.
Is there a specific charging procedure for the Lenovo Pen used with the IdeaPad Flex 5?
The Lenovo Pen for IdeaPad Flex 5 uses a magnetic charging method. Locate the magnetic connector on your device. Attach the pen to this connector. The pen should start charging automatically. An LED light will indicate the charging status.
| Pen Model | Charging Method | Charging Time | Battery Life |
|---|---|---|---|
| Active Pen 2 | USB Dock | 15-30 minutes | Up to 50 hours |
| Precision Pen 2 | USB-C Cable | About 1 hour | Up to 140 hours |
| Yoga 9i Pen | Magnetic | 15 minutes | Up to 40 hours |
| IdeaPad Flex 5 Pen | Magnetic | 30 minutes | Up to 125 hours |


