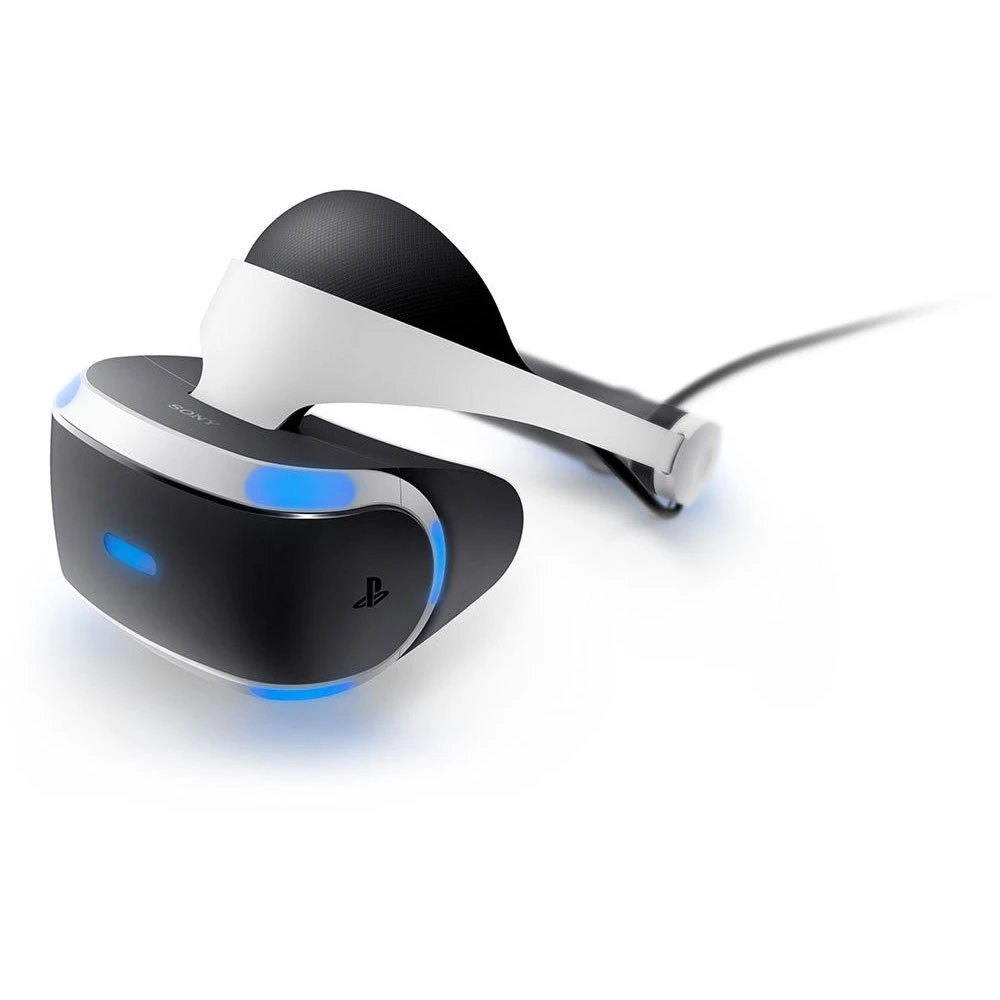
PlayStation VR (PSVR1) brought virtual reality to millions of PS4 owners. But like any tech, it can run into snags. You can fix most common PSVR1 problems at home with simple troubleshooting steps.
Tracking issues, blurry visuals, and connection problems are frequent PSVR1 hiccups. Often, a quick camera recalibration or cable check solves these. For trickier issues, you may need to clean components or update software.
This guide walks you through fixing your PSVR1. You’ll learn to spot common glitches and apply easy fixes. Most problems have quick solutions, getting you back into VR fast.
| Problem | Quick Fix |
|---|---|
| Blurry visuals | Clean lenses, adjust headset fit |
| Tracking issues | Recalibrate camera, check lighting |
| No power | Check cables, restart processor unit |
| Audio problems | Check connections, update software |
Troubleshooting Your PlayStation VR (PSVR 1)
The original PlayStation VR (PSVR 1) can provide immersive gaming experiences, but like any technology, it can sometimes encounter issues. Here’s a guide to troubleshooting common PSVR problems.
1. Tracking Problems
- Problem: The headset or controllers aren’t tracking accurately, causing jittery movements or loss of tracking.
- Solution:
- Lighting: Ensure the room has adequate lighting, but avoid direct sunlight or overly bright lights that can interfere with the camera.
- Reflections: Remove any reflective surfaces in the camera’s view, such as mirrors or glossy furniture.
- Camera Position: Make sure the PlayStation Camera is positioned correctly, about 6 feet away, at a height slightly above your TV.
- Clean the Camera: Wipe the camera lenses with a clean, dry microfiber cloth.
- Recalibrate: Go to Settings > Devices > PlayStation VR > Adjust Tracking Lights to recalibrate the headset and controllers.
- Solution:
2. Blurry Image
- Problem: The image in the headset appears blurry or out of focus.
- Solution:
- Adjust Headset: Tighten the headset’s headband and adjust the scope to ensure it sits comfortably and the lenses are aligned with your eyes.
- Clean the Lenses: Gently clean the headset lenses with a microfiber cloth.
- Adjust Eye-to-Eye Distance (IPD): Use the IPD dial on the headset to adjust the distance between the lenses to match your IPD.
- Solution:
3. No Video Signal
- Problem: The headset displays a black screen or no image.
- Solution:
- Check Connections: Ensure all cables are securely connected to the headset, processor unit, TV, and PS4.
- Power Cycle: Turn off and unplug all devices, then plug them back in and power them on again.
- HDMI Connections: Try different HDMI ports on your TV and processor unit.
- Processor Unit: Make sure the processor unit’s lights are on, indicating it’s receiving power and functioning.
- Solution:
4. Headset Discomfort
- Problem: The headset feels uncomfortable after prolonged use.
- Solution:
- Adjust Fit: Take breaks to adjust the headset’s fit and ensure it’s not too tight.
- Positioning: Experiment with different seating positions to find what’s most comfortable.
- Cooling: Use a small fan to circulate air around you while playing.
- Solution:
5. Audio Issues
- Problem: No sound or distorted audio from the headset.
- Solution:
- Volume Levels: Check the volume levels on the headset and the PS4.
- Mute Button: Make sure the mute button on the headset’s inline remote is not activated.
- Connections: Verify that the headphones are properly plugged into the headset.
- Audio Settings: Go to Settings > Devices > Audio Devices to check the audio output settings.
- Solution:
| Issue | Possible Cause | Solution |
|---|---|---|
| Tracking Problems | Poor lighting, reflections, camera position | Adjust lighting, remove reflections, reposition camera |
| Blurry Image | Incorrect headset fit, dirty lenses | Adjust headset, clean lenses |
| No Video Signal | Loose cables, HDMI issues | Check connections, power cycle, try different HDMI ports |
| Headset Discomfort | Tight fit, prolonged use | Adjust fit, take breaks |
| Audio Issues | Low volume, mute button, connections | Adjust volume, check mute button, verify connections |
If you’ve tried these troubleshooting steps and are still experiencing problems, you may need to contact PlayStation Support for further assistance or explore repair options.
Setting Up the PSVR1
Proper setup ensures optimal performance of your PlayStation VR1 system. Follow these steps to connect cables, calibrate your headset, and position the camera for the best experience.
Proper Connection of Cables
Start by connecting the processor unit to your PS4 console. Plug the HDMI cable from your PS4 into the processor unit’s HDMI PS4 port. Connect another HDMI cable from the processor unit’s HDMI TV port to your TV.
Next, link the USB cable from the processor unit to a USB port on your PS4. Attach the VR headset connection cable to the front of the processor unit.
Finally, connect the AC adapter to power the processor unit. Ensure all cables are firmly seated to avoid connection issues.
| Cable | From | To |
|---|---|---|
| HDMI | PS4 | Processor Unit (PS4 port) |
| HDMI | Processor Unit (TV port) | TV |
| USB | Processor Unit | PS4 |
| VR Headset | VR Headset | Processor Unit |
| AC Adapter | Processor Unit | Power Outlet |
Initial Calibration Procedures
After connecting your PSVR1, you’ll need to calibrate it for the best performance. Turn on your PS4 and PSVR headset. Follow the on-screen instructions to set up your system.
You’ll be asked to measure and input your eye-to-eye distance. This step is crucial for proper 3D image rendering. Stand about 70 cm from the camera and follow the prompts to align your face with the on-screen guide.
Next, adjust the headset for comfort. Ensure it sits securely on your head without being too tight. The front pad should rest on your forehead, and the rear pad on the back of your head.
Adjusting the PlayStation Camera
Proper camera placement is vital for tracking your movements. Position the PlayStation Camera above or below your TV, centered and facing your play area.
Aim the camera slightly downward to capture your full range of motion. Ideally, place it about 4-5 feet off the ground. Ensure there’s enough space around you – about 6 feet between you and the camera is recommended.
Check for reflective surfaces or bright lights in the camera’s view. These can interfere with tracking. Adjust room lighting if needed to reduce glare or shadows.
To confirm proper setup, go to Settings > Devices > PlayStation VR > Adjust PlayStation Camera. This will show you what the camera sees, helping you fine-tune its position for optimal tracking.
Troubleshooting Tracking and Display Issues
PSVR1 tracking and display problems can significantly impact your virtual reality experience. Addressing these issues often involves adjusting your environment, calibrating the system, and fine-tuning headset settings.
Adjusting the Lighting Environment
Proper lighting is crucial for PlayStation VR tracking. Aim for moderate, diffused light in your play area. Avoid bright spots or reflective surfaces that might confuse the camera.
Turn off lights directly behind you. Close curtains to reduce sunlight glare. Remove shiny objects from the camera’s view.
If tracking remains unstable, try dimming room lights slightly. The PS Camera needs to clearly see the headset and controller lights.
Calibrating the Tracking Lights
Regular calibration helps maintain accurate PSVR tracking. Access the calibration menu through:
- PS4 Settings
- Devices
- PlayStation VR
- Adjust Tracking Lights
Follow on-screen prompts to align your headset and controllers. Ensure the camera can see all tracking lights clearly.
Recalibrate if you notice drifting or inaccurate movements. This process takes just a few minutes but can greatly improve your experience.
Field of View Adjustments
Optimizing field of view (FOV) enhances immersion and reduces eye strain. Start by positioning the headset comfortably on your face. Adjust the headband for a snug but not tight fit.
Use the button under the visor to move the display closer or farther from your eyes. Find the sweet spot where the entire screen is clear and in focus.
If you wear glasses, use the eye relief setting to create extra space. This prevents lenses from touching the PSVR screen.
Interpupillary Distance Settings
Correct interpupillary distance (IPD) is key for clear visuals and reduced discomfort. PSVR1 doesn’t have a physical IPD adjustment, but you can set it in software:
- Go to Settings
- Devices
- PlayStation VR
- Measure Eye-to-Eye Distance
Follow the on-screen guide to measure your IPD accurately. Input this value to optimize the display for your eyes.
Recheck your IPD setting periodically, especially if multiple users share the headset.
| Common Issue | Quick Fix |
|---|---|
| Drifting view | Recalibrate tracking lights |
| Blurry visuals | Adjust headset position and IPD |
| Unstable tracking | Check room lighting |
| Display blackouts | Inspect HDMI connections |
These adjustments should resolve most tracking and display issues. If problems persist, consider contacting PlayStation support for further assistance.
Resolving Audio and Microphone Concerns
Audio and microphone issues can hinder your PSVR1 experience. These problems often have simple solutions you can try at home.
Enhancing 3D Sound Experience
The PSVR1’s 3D audio is crucial for immersion. If you’re not getting the full effect, check your headphone connection. Ensure the headphone jack is fully inserted into the VR headset’s inline remote.
Try different headphones to rule out faulty equipment. The PSVR1 works best with stereo headphones. Avoid using wireless or surround sound headsets.
Adjust the 3D audio settings in your PS4 menu. Go to Settings > Devices > Audio Devices. Set “Output to Headphones” to “All Audio”.
If issues persist, restart your PS4 and PSVR system. Unplug all cables and reconnect them firmly.
Troubleshooting Microphone Errors
Microphone problems can disrupt multiplayer communication. First, check if your mic is muted. Look for a mute button on your headset or inline controls.
Ensure the headset is properly connected to the PSVR processing unit. Both cables should be securely plugged in. The white-tipped cable goes into the left port.
Adjust mic settings in your PS4 menu. Go to Settings > Devices > Audio Devices. Set “Input Device” to “Headset Connected to Controller”.
Test your mic in a party chat or voice recording app. If it still doesn’t work, try a different headset to isolate the problem.
| Common Issue | Possible Solution |
|---|---|
| No 3D audio | Check headphone connection, adjust PS4 settings |
| Mic not working | Ensure proper cable connection, check PS4 mic settings |
| Audio cuts out | Restart PSVR system, check for loose connections |
Operating the PSVR1 System Software
The PSVR1 system software enables users to navigate menus, enjoy cinematic experiences, and manage the VR processor unit. Proper operation enhances gameplay and overall virtual reality enjoyment.
Navigating the PlayStation VR Menu
The PlayStation VR menu serves as your gateway to VR content. Press the PS button on your controller to access it. Use the left stick to scroll through options and X to select. The menu displays installed VR games and apps.
You can adjust display settings here. Brightness, screen size, and IPD (interpupillary distance) options help optimize your view. Calibrate your PS Camera for accurate tracking.
The menu also provides quick access to system settings and power options. You can check battery levels for connected devices. Firmware updates for the PSVR headset often appear here when available.
Using Cinematic Mode
Cinematic Mode lets you play non-VR games and use PS4 apps on a large virtual screen. It creates the effect of sitting in front of a movie theater-sized display. You can adjust the screen size to small, medium, or large.
To activate Cinematic Mode, simply turn on your PSVR headset while using non-VR content. The PS4 interface and games will appear on the virtual screen. You can still use your DualShock 4 controller normally.
This feature works with streaming apps like Netflix and YouTube. It’s great for watching movies or TV shows in a more immersive setting. Cinematic Mode also supports 3D Blu-ray playback, adding depth to compatible films.
VR Processor Unit Functionality
The VR Processor Unit is the small box that connects your PSVR headset to the PS4. It handles 3D audio processing and displays the VR image on your TV. This allows others to see what you’re experiencing in VR.
The unit manages HDCP encryption between the PS4 and TV. It ensures compatibility with various display devices. The processor also enables the Social Screen feature, letting friends watch your VR gameplay.
To troubleshoot connection issues, check that all cables are securely plugged in. If problems persist, try power cycling the processor unit by holding the power button for 7 seconds.
| Processor Unit Function | Description |
|---|---|
| 3D Audio Processing | Creates immersive sound |
| Social Screen | Displays VR view on TV |
| HDCP Management | Ensures display compatibility |
| Video Processing | Handles VR image output |
Frequently Asked Questions
PlayStation VR users often encounter common issues. These can range from display problems to connectivity challenges. Here are some solutions to typical PSVR1 problems.
How can I resolve the black screen issue on my PlayStation VR?
Check all connections are secure. Ensure the HDMI cables are properly plugged in. Clean the connectors with a dry cloth to remove dust. Restart your PS4 and PSVR processor unit.
If the issue persists, try a different HDMI cable. Update your PS4 system software and PSVR firmware to the latest versions.
What steps are needed to connect PSVR1 to PlayStation 5?
PSVR1 is compatible with PS5, but requires an adapter. Request a free PS Camera adapter from Sony’s website. Connect the PS Camera to the adapter, then to your PS5.
Plug the PSVR processor unit into your PS5 using HDMI cables. Follow on-screen setup instructions to complete the connection process.
Why is there no USB connection being detected for PSVR1?
Try a different USB port on your console. Use the original USB cable that came with your PSVR. Restart your PS4 or PS5 and reconnect the PSVR.
If problems continue, test the PSVR on another console if possible. This helps determine if the issue is with your PSVR or the console.
How do I reset the PSVR1 headset?
Press and hold the power button on the inline remote for 7 seconds. This will force the PSVR to shut down. Wait a few moments, then press the power button again to restart.
If issues persist, unplug all cables from the processor unit. Wait 30 seconds, then reconnect everything and power on.
Why won’t my PSVR1 headset power on?
Check the power cable connections. Ensure the processor unit is receiving power. Try a different power outlet. Press and hold the power button on the inline remote for a few seconds.
If the headset still won’t turn on, the battery might need replacement. Contact Sony support for repair options if under warranty.
What should I do if my PSVR1 keeps losing connection or blacking out?
Check for loose cables. Ensure the processor unit has proper ventilation. Clean the fan to prevent overheating. Update your PS4 system software and PSVR firmware.
Try moving potential sources of interference like wireless devices away from your PSVR setup. If problems continue, perform a full system restart.
| Issue | Quick Fix |
|---|---|
| Black screen | Check HDMI connections |
| No USB detected | Try different USB port |
| Won’t power on | Verify power connections |
| Losing connection | Update firmware |
| PS5 connection | Use camera adapter |


