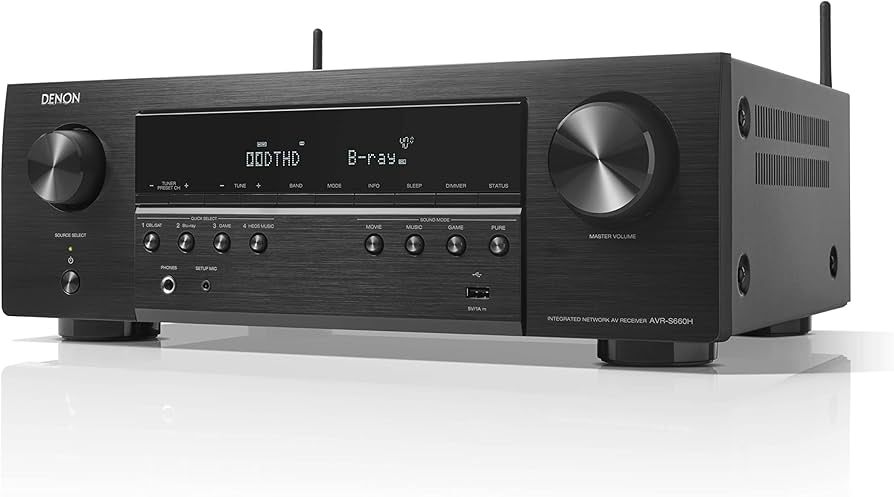
Connecting your TV to a Denon receiver with HDMI is a simple process that enhances your home entertainment setup. To connect your TV to a Denon receiver, plug one end of an HDMI cable into the HDMI output port on the receiver and the other end into an HDMI input port on your TV. This method provides high-quality audio and video transmission through a single cable.
Many modern TVs and Denon receivers support ARC (Audio Return Channel) or eARC (Enhanced Audio Return Channel) features. These allow your TV to send audio back to the receiver through the same HDMI cable. This is useful for built-in smart TV apps or connected devices.
After connecting the HDMI cable, you may need to adjust settings on both your TV and Denon receiver. Enable HDMI control features and select the correct input source on your devices. This ensures proper communication between your TV and receiver for optimal performance.
| Connection Type | Audio Quality | Video Quality | Ease of Setup |
|---|---|---|---|
| HDMI | Excellent | Excellent | Easy |
| Optical | Good | N/A | Moderate |
| Coaxial | Good | N/A | Moderate |
Connecting Your TV to a Denon Receiver: A Simple Guide
Connecting your TV to a Denon receiver unlocks a world of better audio for all your movies, shows, and games. Follow these steps for a seamless setup:
1. Choose the Right Connection
The best connection for audio quality is HDMI. Here’s why and what other options you have:
- HDMI (Recommended): Supports both audio and video, including high-resolution formats like Dolby Atmos and DTS:X. Use an HDMI cable labeled “High Speed” for the best results.
- Optical (Toslink): Good for older TVs or if you’ve run out of HDMI ports on your receiver. Supports surround sound but not the latest audio formats.
- Coaxial: Another digital audio option, but less common than HDMI or optical.
2. Connect the Cables
- HDMI: Connect an HDMI cable from the HDMI OUT (or ARC/eARC) port on your TV to an available HDMI IN port on your Denon receiver.
- Optical/Coaxial: Connect an optical or coaxial cable from the corresponding output on your TV to the matching input on your receiver.
3. Configure Your TV and Receiver
- TV Audio Output: Go to your TV’s audio settings and select the output you’re using (HDMI, Optical, or Coaxial). You might also need to enable ARC/eARC if using HDMI.
- Receiver Input: On your Denon receiver, select the input that matches the connection you used (e.g., HDMI 1, TV Audio, etc.). You can usually do this using the input selector buttons on the front panel or the remote.
4. Test the Connection
Play some content on your TV and check if the audio is coming through your Denon receiver’s speakers. Adjust the volume on the receiver to your liking.
HDMI-CEC for Simplified Control
HDMI-CEC (Consumer Electronics Control) allows devices to control each other over HDMI. This means you might be able to use your TV remote to control the volume on your Denon receiver.
- Enable HDMI-CEC: Look for HDMI-CEC settings on both your TV and receiver. They might be called different names, like Anynet+ (Samsung), Bravia Sync (Sony), or SimpLink (LG).
Troubleshooting Tips
- No Sound: Double-check all connections and ensure the correct input is selected on your receiver. Make sure the volume on both your TV and receiver is turned up.
- Sound but No Surround Sound: Verify your TV is outputting surround sound and that your source content supports it. Check the audio settings on your receiver.
- Audio Delay: Adjust the audio delay settings on your TV or receiver to synchronize the sound with the video.
Connecting Other Devices
Besides your TV, you can connect other devices to your Denon receiver for a complete home theater experience:
- Blu-ray/DVD players: Use HDMI for the best audio and video quality.
- Game consoles: Connect your PlayStation or Xbox via HDMI.
- Streaming devices: Connect your Roku, Apple TV, or Fire TV Stick using HDMI.
- Turntables: Use the phono input if your receiver has one. You might need a separate phono preamp if your turntable doesn’t have one built-in.
Understanding HDMI Connectivity
HDMI simplifies connecting your TV to a Denon receiver. This technology carries high-quality audio and video over a single cable. Let’s explore the key aspects of HDMI connectivity.
Types of HDMI Ports and Cables
HDMI ports come in different sizes:
- Standard (Type A): Most common on TVs and receivers
- Mini (Type C): Found on some cameras and laptops
- Micro (Type D): Used in smartphones and tablets
HDMI cables also vary:
- Standard HDMI: Supports 1080p resolution
- High Speed HDMI: Handles 4K video at 30Hz
- Premium High Speed: 4K at 60Hz with HDR
- Ultra High Speed: 8K resolution and eARC support
Choose a cable that matches your devices’ capabilities. A Premium High Speed HDMI cable is suitable for most modern setups.
The Role of ARC and eARC
Audio Return Channel (ARC) lets your TV send audio back to your Denon receiver through the same HDMI cable. This feature simplifies your setup by eliminating the need for a separate audio cable.
eARC (Enhanced Audio Return Channel) improves on ARC:
- Supports higher-quality audio formats
- Allows for higher bandwidth
- Reduces lip-sync issues
To use ARC or eARC:
- Connect your devices with a compatible HDMI cable
- Enable HDMI-CEC on both your TV and receiver
- Set the TV’s audio output to “External Speaker” or “Receiver”
Compatibility and HDMI Standards
HDMI standards have evolved over time:
| HDMI Version | Max Resolution | Max Refresh Rate | Key Features |
|---|---|---|---|
| HDMI 1.4 | 4K | 30Hz | ARC, 3D |
| HDMI 2.0 | 4K | 60Hz | HDR |
| HDMI 2.1 | 8K | 120Hz | eARC, VRR |
Check your TV and Denon receiver’s HDMI versions. Newer standards are backward compatible, but you’ll need matching HDMI versions to use advanced features.
For optimal performance:
- Use HDMI 2.0 or higher for 4K content
- Ensure your HDMI cable meets the required specifications
- Update your devices’ firmware regularly
By understanding these HDMI concepts, you can connect your TV to your Denon receiver effectively and enjoy high-quality audio and video.
Setting Up Your Denon Receiver
Properly configuring your Denon receiver ensures optimal audio and video performance. Connecting HDMI cables, adjusting audio settings, and updating firmware are key steps in the setup process.
Connecting HDMI Cables to Denon Receivers
Connecting your TV to a Denon receiver via HDMI is straightforward. First, locate the HDMI output port on your Denon AVR. Connect one end of the HDMI cable to this port. Then, plug the other end into an HDMI input on your TV.
For additional devices like gaming consoles or streaming boxes, use the HDMI input ports on your Denon receiver. These are usually labeled for easy identification.
Make sure to use high-quality HDMI cables that support the latest standards. This ensures you get the best possible audio and video quality from your setup.
Configuring Audio Output Settings
After connecting your devices, it’s time to configure the audio settings. Turn on your TV and Denon receiver. Navigate to the receiver’s setup menu using the remote control.
Look for the “Audio” or “Sound” section in the menu. Here, you’ll find options to adjust speaker settings, audio modes, and HDMI audio output.
Select the appropriate audio format based on your speaker setup. For example, choose Dolby Atmos if you have compatible speakers. Adjust speaker levels and distances for optimal sound balance.
| Setting | Description |
|---|---|
| Audio Mode | Select sound processing (e.g., Stereo, Surround) |
| Speaker Config | Set up speaker size and presence |
| Channel Level | Adjust volume for each speaker |
| Distance | Set speaker distance from listening position |
Firmware Updates for Enhanced Performance
Keeping your Denon receiver’s firmware up to date is crucial for optimal performance. Firmware updates can add new features, fix bugs, and improve compatibility with the latest devices.
To check for updates, go to the “General” or “System” settings in your receiver’s menu. Look for a “Firmware Update” option. If available, follow the on-screen instructions to download and install the update.
Ensure your receiver is connected to the internet via Ethernet or Wi-Fi before starting the update process. Don’t turn off the receiver during the update to avoid potential damage.
Regular firmware updates help maintain your Denon AVR’s performance and compatibility with new technologies.
Optimizing Audio Experience
Enhancing your audio setup can significantly improve your home theater experience. By adjusting settings and integrating advanced formats, you’ll unlock the full potential of your Denon receiver and TV combination.
Adjusting Audio Settings for Optimal Sound
Start by accessing your Denon receiver’s menu to fine-tune audio settings. Adjust the equalizer to match your room’s acoustics and personal preferences. Experiment with bass and treble levels to find the right balance.
Use the receiver’s built-in calibration system, like Audyssey, to optimize speaker levels and distances automatically. This ensures each speaker delivers sound at the correct volume and timing.
Consider these key settings:
- Crossover frequency
- Dynamic range compression
- Dialogue enhancement
Don’t forget to adjust your TV’s audio output settings. Set it to “External speakers” or “Audio system” to route sound through the Denon receiver properly.
Integrating Advanced Audio Formats
Take advantage of your Denon receiver’s support for advanced audio formats like Dolby Atmos and DTS. These technologies create a more immersive soundstage by adding height channels to traditional surround sound setups.
To enable these formats:
- Ensure your content supports Dolby Atmos or DTS
- Set your receiver to the correct sound mode
- Position additional speakers or use upward-firing modules for height effects
Check your TV’s audio capabilities. Many modern TVs can pass through these advanced formats via HDMI ARC or eARC.
| Audio Format | Features | Setup Requirements |
|---|---|---|
| Dolby Atmos | 3D object-based audio | Height speakers or upward-firing modules |
| DTS | Flexible speaker placement | Compatible receiver and content |
Remember to update your Denon receiver’s firmware regularly to ensure compatibility with the latest audio formats and features.
Troubleshooting Common Issues
When connecting your TV to a Denon receiver with HDMI, you may encounter some challenges. These issues can often be resolved with a few simple steps.
Addressing HDMI Connection Challenges
Check all HDMI cables and ensure they’re securely plugged in. Verify that you’re using the correct HDMI ports on both your TV and receiver. Some TVs have specific HDMI ports for ARC (Audio Return Channel) functionality.
Try using a different HDMI cable to rule out cable issues. Ensure your HDMI cables are high-speed and support the latest standards.
Reset both your TV and Denon receiver. Unplug them from power for 30 seconds, then plug them back in and power on.
Check your Denon receiver’s HDMI settings. Navigate to the setup menu and ensure HDMI control is enabled.
| Common HDMI Issues | Quick Fixes |
|---|---|
| No signal | Check cable connections |
| Poor picture quality | Use high-speed HDMI cable |
| No sound | Enable ARC in TV settings |
| Intermittent connection | Reset devices |
Resolving Audio Sync Problems
Audio sync issues can be frustrating. Start by checking your Denon receiver’s audio delay settings. You can usually adjust this in the receiver’s setup menu.
Ensure your TV’s audio output is set to “External Speaker” or “Receiver.” This setting is often found in the TV’s sound menu.
If using ARC, make sure it’s enabled on both your TV and receiver. Some TVs require you to turn on a setting called “Simplink” or “HDMI-CEC” for ARC to work properly.
Try disabling any sound processing features on your TV. These can sometimes cause sync issues.
Update the firmware on both your TV and Denon receiver. Outdated software can lead to audio sync problems.
Utilizing Alternate Connectivity Options
If HDMI connection issues persist, consider using alternative methods. Optical cables provide high-quality digital audio and are less prone to compatibility issues.
To use an optical connection:
- Connect an optical cable from your TV’s optical out to your Denon receiver’s optical in.
- Set your TV’s audio output to “Optical” or “Digital Out.”
- Select the correct input on your Denon receiver.
RCA cables offer an analog connection option. While not as high-quality as HDMI or optical, they’re simple and reliable.
For RCA connection:
- Connect RCA cables from your TV’s audio out to your receiver’s analog inputs.
- Set your TV’s audio output to “Fixed” or “Line Out.”
- Choose the corresponding input on your Denon receiver.
Remember to check your TV’s audio settings and select the appropriate output for your chosen connection method.
Frequently Asked Questions
Connecting a TV to a Denon receiver with HDMI can raise several questions. Here are answers to some common issues users face during setup and troubleshooting.
How do I setup my Denon receiver to play audio from my TV using HDMI?
To set up your Denon receiver for TV audio:
- Connect an HDMI cable from your TV’s ARC port to the ARC-labeled HDMI port on your Denon receiver.
- Enable HDMI Control on both devices.
- Set the TV audio output to “External Speakers” or “Receiver.”
- Select the correct input on your Denon receiver.
Test the connection by playing audio from your TV. You may need to adjust settings in your TV’s sound menu for optimal performance.
What are the steps to connect my Samsung TV to a Denon receiver using an HDMI cable?
Follow these steps to connect your Samsung TV to a Denon receiver:
- Power off both devices.
- Locate the HDMI ARC port on your TV and receiver.
- Connect one end of the HDMI cable to your TV’s ARC port.
- Plug the other end into the ARC-labeled HDMI port on your Denon receiver.
- Turn on both devices.
- Set your TV’s audio output to “Receiver” or “External Speakers.”
- Enable HDMI-CEC on both devices (called Anynet+ on Samsung TVs).
Why is the Denon receiver’s HDMI connection not producing any sound with my TV?
If you’re not getting sound:
- Check that you’re using the ARC-labeled HDMI ports on both devices.
- Ensure HDMI-CEC is enabled on your TV and receiver.
- Verify the TV’s audio output is set to “External Speakers” or “Receiver.”
- Try a different HDMI cable.
- Update the firmware on both your TV and Denon receiver.
- Reset the HDMI connection by unplugging both devices for a minute.
In what order should I connect my devices if I want to use HDMI through my Denon receiver to my TV?
For optimal HDMI connection:
- Power off all devices.
- Connect source devices (Blu-ray, game console, etc.) to your Denon receiver’s HDMI inputs.
- Connect the Denon receiver’s HDMI output to your TV’s ARC port.
- Power on the TV first, then the receiver, and finally your source devices.
- Set the correct input on your Denon receiver for each source.
This setup allows your receiver to process audio and pass video to your TV.
What should I do if the Denon setup menu is not displaying on my TV?
If the Denon setup menu isn’t showing:
- Ensure the HDMI cable is securely connected to the correct ports.
- Try a different HDMI input on your TV.
- Check if your TV is set to the correct input.
- Verify the Denon receiver is powered on and set to output video.
- Test with a different HDMI cable.
- Reset the receiver to factory settings if all else fails.
How can I resolve an issue where my Denon receiver is stuck on ‘setup use TV’ when connected via HDMI?
To fix a Denon receiver stuck on ‘setup use TV’:
- Ensure your TV is turned on and set to the correct HDMI input.
- Check that HDMI-CEC is enabled on both devices.
- Disconnect and reconnect the HDMI cable.
- Power cycle both the TV and receiver.
- Try connecting to a different HDMI port on your TV.
- Update the firmware on your Denon receiver.
- Perform a factory reset on the receiver if the issue persists.
| Common Issue | Quick Fix |
|---|---|
| No sound | Check ARC ports and HDMI-CEC settings |
| No video | Verify HDMI connections and input selection |
| Setup menu not showing | Try different HDMI ports or cables |
| Receiver stuck on setup | Power cycle devices and check HDMI-CEC |

