How to Enable TPM 2.0 in BIOS

Anthony Redd

Asus BIOS

Enabling TPM 2.0 in your Aorus BIOS is key for running Windows 11 and boosting system security. To turn on TPM 2.0, restart your PC, press Delete to enter BIOS, navigate to Settings > Miscellaneous > Trusted Computing, and set Security Device Support to Enable. This process activates the Trusted Platform Module, which safeguards your data and improves system integrity.

Many users find BIOS settings daunting, but Aorus makes it simple. You don’t need extra hardware – most modern Aorus motherboards support TPM 2.0 through firmware. By enabling this feature, you’re taking a big step in protecting your digital life.

TPM 2.0 BenefitsImpact
Enhanced SecurityProtects against data theft
Windows 11 ReadyMeets OS requirements
Improved EncryptionSecures sensitive information

Enabling TPM 2.0 in Your Computer’s BIOS

TPM 2.0 is a security feature that can help protect your computer from malware and other threats. Many newer operating systems, like Windows 11, require it. Here’s how to enable it in your BIOS:

1. Access Your BIOS Settings

To enter your BIOS settings, you’ll need to press a specific key during the boot process. This key is usually Del, F2, F10, or Esc, but it can vary depending on your computer’s manufacturer.

  • Look for a message during startup that says something like “Press [key] to enter setup” or “Press [key] to enter BIOS.”
  • Press the indicated key repeatedly as soon as you see the message.

2. Find the TPM Settings

Once you’re in the BIOS, the TPM settings might be in different places depending on your BIOS. Here are some common locations:

  • Security Tab: Look for options like “TPM Security,” “TPM State,” or “TPM Configuration.”
  • Advanced Tab: Sometimes TPM settings are grouped under “Advanced” or “System Configuration.”
  • Peripherals Tab: You might find TPM under “Trusted Computing” or similar.

3. Enable TPM 2.0

  • The exact name of the setting will vary. Look for options like:
    • TPM Support
    • TPM State
    • Intel PTT (Platform Trust Technology) (for Intel systems)
    • AMD fTPM (firmware TPM) (for AMD systems)
  • Change the setting to “Enabled,” “On,” or “Activate.”

4. Save and Exit

  • Save your changes and exit the BIOS. Your computer will restart.

Important Notes:

  • Consult your motherboard manual: If you can’t find the TPM settings, refer to your motherboard manual for specific instructions.
  • Update your BIOS: If you don’t see any TPM settings, you might need to update your BIOS to the latest version.

Alternative Names for TPM 2.0

Sometimes, TPM 2.0 is referred to by different names in the BIOS. Keep an eye out for these terms:

  • PTT (Platform Trust Technology): This is the name Intel uses for its TPM implementation.
  • fTPM (firmware TPM): This is how AMD refers to its TPM functionality.
  • Security Device Support
  • Trusted Computing

If you’re having trouble enabling TPM 2.0, check your motherboard manual or contact your computer’s manufacturer for assistance.

Understanding BIOS and TPM 2.0

BIOS and TPM 2.0 play crucial roles in system security. They work together to protect your computer from unauthorized access and potential threats.

The Role of BIOS in System Security

BIOS, or Basic Input/Output System, is the first software that runs when you turn on your computer. It initializes hardware components and loads the operating system. BIOS settings control various security features, including TPM activation.

BIOS updates often include security patches to fix vulnerabilities. Keeping your BIOS up-to-date is essential for maintaining system security. Many modern systems use UEFI (Unified Extensible Firmware Interface) instead of traditional BIOS, offering enhanced security features.

BIOS settings allow you to:

  • Enable or disable TPM
  • Set up boot passwords
  • Configure secure boot options

What Is TPM 2.0 and Its Importance

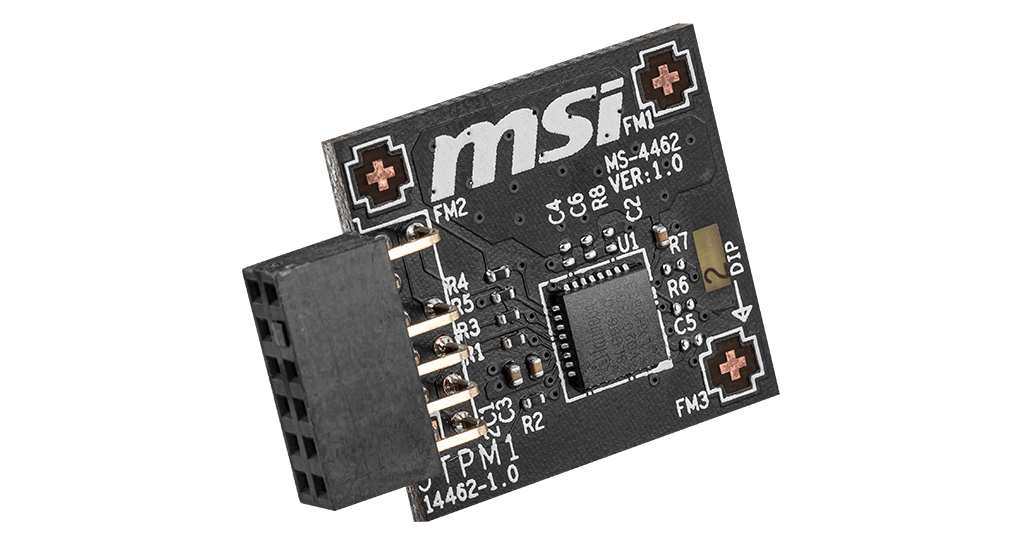
TPM 2.0 (Trusted Platform Module) is a hardware-based security chip that stores cryptographic keys. It enhances system security by protecting sensitive data and verifying system integrity.

Key features of TPM 2.0:

  • Encryption key storage
  • Hardware-based random number generation
  • Secure boot process validation

TPM 2.0 is crucial for:

  1. Full-disk encryption
  2. Protection against firmware attacks
  3. Secure storage of passwords and certificates

Some systems use firmware-based TPM (fTPM) or Intel Platform Trust Technology (PTT) instead of a physical TPM chip. These alternatives offer similar security benefits to hardware TPM.

How to Access and Navigate BIOS on Aorus Motherboards

Accessing and navigating the BIOS on Aorus motherboards is crucial for enabling TPM 2.0 and other important system settings. The process involves specific steps to enter the BIOS setup, move through various menus, and identify your current BIOS version.

Entering BIOS Setup

To access the BIOS on your Aorus motherboard, restart your computer. As it boots up, watch for a message indicating which key to press. This is usually the Delete key or a function key like F2.

Press the designated key quickly and repeatedly until the BIOS screen appears. If you miss the window, simply restart your computer and try again.

Timing is important. Start pressing the key as soon as you see the Aorus logo on screen. This ensures you don’t miss the brief opportunity to enter BIOS.

Navigating BIOS Settings

Once in the BIOS, you’ll see a menu-based interface. Use your keyboard to navigate:

  • Arrow keys: Move between options
  • Enter: Select an option or enter a submenu
  • Esc: Go back or exit current menu
  • F10: Save changes and exit

Aorus BIOS typically has a dual interface mode:

  1. Easy Mode: Simple layout for basic settings
  2. Advanced Mode: Detailed options for more control

To switch between modes, look for an option like “Switch to Advanced Mode” or press F2.

Key areas to explore include:

  • M.I.T. (MB Intelligent Tweaker): For overclocking
  • System: Basic system information
  • BIOS: BIOS-related settings
  • Peripherals: Device configurations
  • Chipset: Advanced chipset settings
  • Power: Power management options
  • Save & Exit: Save changes or load defaults

Identifying Your BIOS Version

Knowing your BIOS version is important for updates and troubleshooting. To find this information:

  1. Look at the main BIOS screen. The version is often displayed at the top or bottom.
  2. If not visible, navigate to the “Main” or “System Information” section.
  3. Look for entries like “BIOS Version” or “BIOS Revision”.
BIOS InformationLocation
Version NumberMain Screen or System Info
Release DateMain Screen or System Info
Build IDAdvanced Settings

Gigabyte Aorus motherboards regularly release BIOS updates. Check the Gigabyte website for your specific model to ensure you’re running the latest version with all security features and improvements.

Enabling TPM 2.0 and Secure Boot in BIOS

To upgrade to Windows 11 you need to enable TPM 2.0 and Secure Boot in your BIOS. This process involves navigating your BIOS settings and making the necessary changes.

Locating the TPM 2.0 Setting

To find the TPM 2.0 setting restart your computer and enter the BIOS. On Aorus motherboards press the Delete key during startup. Look for the “Settings” or “Advanced” menu. The TPM option may be called “Security Device Support” “AMD fTPM” or “Intel PTT” depending on your CPU.

If you don’t see a TPM option check for a firmware update for your motherboard. Newer BIOS versions often add TPM support.

Once you find the TPM setting change it from “Disabled” to “Enabled” or “Firmware TPM.” Save your changes and exit the BIOS.

After enabling TPM you can verify it’s working by typing “tpm.msc” in the Windows Run dialog.

Enabling Secure Boot for Enhanced Security

Secure Boot prevents unauthorized operating systems from loading during startup. To enable it go back into your BIOS settings. Look for the “Boot” or “Security” menu.

Find the Secure Boot option and set it to “Enabled.” You may need to switch from “Legacy Boot” to “UEFI Boot” mode first.

Some motherboards require you to load factory default keys before enabling Secure Boot. Check your manual if you encounter issues.

After enabling save your changes and exit. Your system will now boot with TPM 2.0 and Secure Boot active meeting Windows 11 requirements.

SettingLocation in BIOSOptions
TPM 2.0Settings/AdvancedDisabled/Enabled/Firmware TPM
Secure BootBoot/SecurityDisabled/Enabled
Boot ModeBootLegacy/UEFI

System Compatibility and Final Steps

Ensuring your system meets Windows 11 requirements and keeping it up-to-date are crucial steps. These processes verify compatibility and enhance security for a smooth upgrade experience.

Verifying System meets Windows 11 Requirements

Check if your PC is ready for Windows 11 using the PC Health Check app. This tool assesses your hardware against Microsoft’s minimum specs. Key requirements include a compatible 64-bit processor, 4GB RAM, and 64GB storage.

TPM 2.0 is essential. Verify its activation in Windows by pressing Win+R, typing “tpm.msc”, and hitting Enter. Look for “The TPM is ready for use” message.

For CPU support, consult Microsoft’s list of compatible processors. Most modern AMD and Intel chips work well.

RequirementMinimum Specification
Processor1 GHz, 2+ cores, 64-bit
Memory4 GB RAM
Storage64 GB
TPMVersion 2.0

Updating BIOS and Security Patches

Start by updating your AORUS motherboard’s BIOS. Visit the official GIGABYTE website and download the latest BIOS version for your model. Follow the instructions carefully to avoid issues.

After updating, check for any new Windows updates. These often include important security patches. Go to Settings > Windows Update and click “Check for updates”.

Enable automatic updates to stay protected. Windows Security app provides real-time protection against threats. Keep it on and up-to-date.

Regular updates improve system stability and can boost gaming performance. They also ensure compatibility with new features like Android app support on Windows 11.

Frequently Asked Questions

Enabling TPM 2.0 on Gigabyte AORUS motherboards involves specific steps in the BIOS. Different models may have slightly different processes, but the core concepts remain similar.

What steps are required to activate TPM 2.0 on a Gigabyte AORUS motherboard?

To activate TPM 2.0 on a Gigabyte AORUS motherboard:

  1. Restart your computer and enter BIOS by pressing the designated key (often Delete or F2).

  2. Navigate to the “Security” or “Advanced” section.

  3. Look for “Trusted Platform Module” or “TPM Device” options.

  4. Enable TPM 2.0 by selecting “Enabled” or “Active.”

  5. Save changes and exit BIOS.

How do I enable TPM 2.0 in an Intel-based Gigabyte BIOS setup?

For Intel-based Gigabyte motherboards:

  1. Access BIOS during system startup.

  2. Find the “Security” tab in the BIOS menu.

  3. Locate “PTT” (Platform Trust Technology) or “Intel Platform Trust Technology.”

  4. Set this option to “Enabled.”

  5. Save and exit BIOS.

Where can I find the setting to enable TPM 2.0 in a Gigabyte B450 BIOS configuration?

In Gigabyte B450 BIOS:

  1. Enter BIOS setup at startup.

  2. Go to the “Settings” or “Advanced” menu.

  3. Look for “AMD fTPM” or “AMD CPU fTPM.”

  4. Change the setting to “Enabled.”

  5. Save and restart your system.

Can you list the Gigabyte motherboards that support TPM 2.0?

Many Gigabyte motherboards support TPM 2.0. Here’s a brief list:

ChipsetSupported Models
IntelZ590, H570, B560
AMDX570, B550, A520

Check your specific model’s documentation for confirmation.

What is the process to verify that TPM 2.0 is enabled on my system?

To verify TPM 2.0 is enabled:

  1. Press Windows + R, type “tpm.msc” and hit Enter.

  2. Check the status in the TPM Management window.

  3. If it says “The TPM is ready for use,” TPM 2.0 is active.

What method should be followed to turn on TPM 2.0 in a Gigabyte BIOS for AMD systems?

For AMD-based Gigabyte systems:

  1. Enter BIOS at system startup.

  2. Navigate to “Settings” or “Advanced” menu.

  3. Find “AMD CPU fTPM” or “AMD fTPM switch.”

  4. Set the option to “Enabled.”

  5. Save changes and exit BIOS.